Lens flare gives a decent look to your scene when you have the Sun visible. If you are an artist, you can create multiple lens flares with different texture. But you don’t have to be one to make a lens flare in Unity.
In this tutorial, we will learn how to create a simple lens flare for your Sun without the use of any custom textures.

I am using Unity 6 for this tutorial.
Step 1: Make Sure the Light is Visible
Change your directional lights rotation so that the Sun is in the camera view.
By default, Unity adds a camera and a directional light to your new scene. If you move your camera around you must be able to see the Sun embedded into the skybox. The position of the Sun depends on the rotation of your directional light.
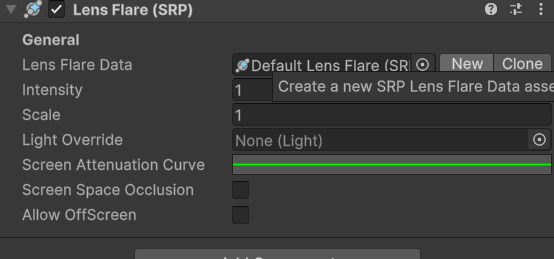
Step 2: Add a Lens Flare Component
Now select your light source in the hierarchy.
Search for Lens Flare (SRP) or the one that matches your render pipeline (URP, HDRP, etc.)
Click Add Component
Step 3: Create a New Lens Flare Asset
Don’t use the default asset that comes with Unity — it’s very basic.
Instead:
- In the Lens Flare component, click the “New” button to create a custom asset.
- Name it something like
MyLensFlare.
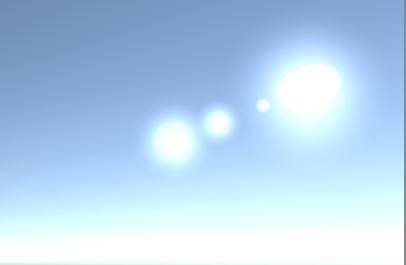
Step 4: Understand Real Lens Flare Behavior
Before we tweak our asset, here’s a quick observation:
- Flares farther from the light source are usually bigger and more transparent
- Flares closer to the light source are smaller and brighter
This helps us create something that looks realistic and dynamic.
Step 5: Add Flare Elements
Now select the lens flare asset you just created.
- In the Inspector, click Add Element
- Choose a type: circle, polygon, image, etc.
- Each element adds a piece to your overall flare

Step 6: Customize Each Element
Adjust the following settings for each flare element:
- Starting Position: How far from the light source it appears
- Scale: Size of the element
- Intensity & Color: To match your scene’s vibe

Step 7: Add More Elements as Needed
Keep adding and tweaking elements until your lens flare looks just right. You can mix and match shapes, add glows, and layer streaks.
Step 8: Enable It in Game View
To actually see the flare in play mode:
- Select your Main Camera
- Add the Lens Flare Layer component
- Make sure Post Processing is enabled

That’s it . You’ve successfully created a custom lens flare in Unity 6! This simple effect can add a lot of realism and polish to your scenes.
