Understanding Unity UI anchors and Pivots is very important for designing UI. In our last tutorial, we saw some basic steps that you need to follow to make the UI scalable to different screen sizes. But to truly understand how the system works you need a good understanding of anchors and pivots.
Here is the article content in video format

When you add a UI element to the scene, it adds a canvas and an event system to the Hierarchy.
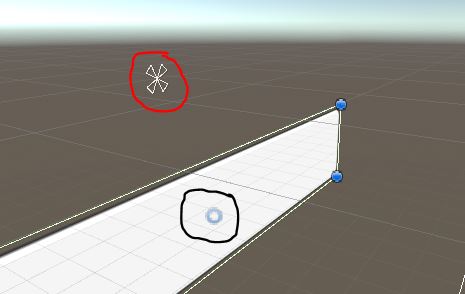
When you select the UI element and look at it in the scene view. You will see a blue dot and four triangles as shown in the image below. The ones inside the red circle are the anchors and the dot inside the blue circle is your Pivot.
UI Anchors
UI Anchors position is based on the parent game object. So, if your UI game object is a child of Canvas then the Anchor position will change based on the Canvas scale.
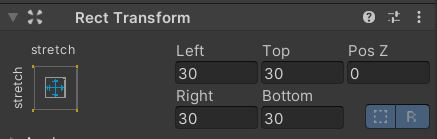
Every UI has a rect transform. The values that you can set will change based on the Anchor presents you select. For example, if you select the Anchor to be at the center of the screen then you can enter how far the UI pivot will be from the anchor position in the x and y axis. Also, you can define the width and height from the pivot position.
If you select the Anchor to be at the Strech position (set to four comers) then you can set how far each corner of the UI element is from the anchor.

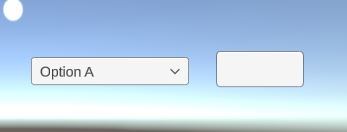
In the first case, where the Anchors are set to the center the UI element will not scale based on the canvas size but remain at a fixed distance from the center.
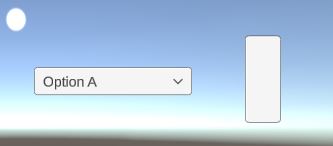
In case of the Strech anchors the UI element will scale based on the canvas as the Anchors will move according to the Canvas size.
In simple terms, if you want the UI to scale then you need to use the Strech anchor. Or if you want the UI to remain at a fixed distance from a point (center, top, bottom or sides) and not move based on screen size then you can set the anchor points to that point.
UI pivot
Pivot is the center point for all scaling and rotation of the UI element. You can set the pivot anywhere you want but remember all the values in the rect transform that you have set while configuring the anchor refers to the pivot.
So, if you shift the Pivot after configuring all settings then you will need to redo all.
Let’s see an example of how the UI element will rotate if the pivot is set to the left corner.
Similarly, the pivot also effects the game object when you try to scale. Let’s try to scale the UI by 2 times in the x axis with pivot at center and pivot at left corner.


This guide should have given you some basic idea on how to use pivot and anchors for your UI elements. If you have any other questions then feel free to comment below.