New Input system of Unity has a lot of components that simplify the way we create scripts. The player input component is one such thing. If you looking to create a custom FPS controller without using the player input component, then you can check out our other tutorial on Creating an FPS controller using New Input System in Unity.
In the other tutorials on new input system, we create an object of the Input action asset and subscribe to the Input action. With Player input component, the subscription part is taken care by the player input component. You just need to add the functions corresponding to the actions.

Advantages of using the Player Input Component
- No need to generate a C# class for the Input action asset.
- Actions can be accessed without being subscribed.
- Auto switch between control schemes based on device.
Setting up Player Input Component
To use the player input component, you should have installed the new input system. If you have not, then check out our guide on getting started with new input system in Unity.
After installation. Select your player game object in the hierarchy and click on add component. Search for Player input and add the component.
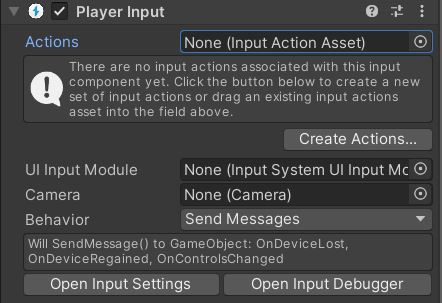
You need to assign an Input action asset to the actions parameter. If you don’t have an Input action asset then just click on Create Actions, give it a name and save it. Unity will create a default action map with Move, Look and Fire actions.
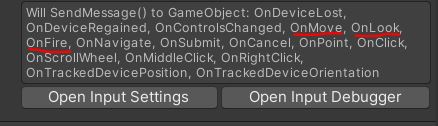
All the other settings will remain same. After adding the Input action asset, you can now create function as shown in the message below the Behavior parameter.
Creating the script
You need to add the script to the same gameobject to which the Player Input component is attached. Now you can create functions as shown in the above message and these functions will be called when the player triggers the corresponding input action. Here is an example script.
using UnityEngine;
using UnityEngine.InputSystem;

public class PlayerController : MonoBehaviour
{
    [SerializeField] GameObject playerCamera;
    void OnLook(InputValue delta)
    {
        Vector2 inputRot=rot.Get<Vector2>();
        Vector3 camRot=cam.transform.rotation.eulerAngles;
        camRot.x+=inputRot.y;
        camRot.y+=inputRot.x;
        cam.transform.rotation=Quaternion.Euler(camRot);
    }
    void OnFire()
    {
          Debug.Log("Fire actions triggered");
    }
    void OnMove()
    {
        Debug.Log("Moved");
    }
}
To get the value of the actions. You can pass a parameter of type InputValue to the function and get the value using the Get<> call. The same is demonstrated in the OnLook function in the above script.
Now let’s try to move the player using the OnMove function. Let’s get the value and add it to the current position of the player. Then let’s use Rigidbody moveposition to move the player. If you need smooth movement then
Here is the complete script to move the player.
using UnityEngine;
using UnityEngine.InputSystem;

public class PlayerController : MonoBehaviour
{
    [SerializeField]GameObject cam;
    Rigidbody rb;

    void Start()
    {
        rb=GetComponent<Rigidbody>();
    }
    void OnLook(InputValue rot)
    {
        Vector2 inputRot=rot.Get<Vector2>();
        Vector3 camRot=cam.transform.rotation.eulerAngles;
        camRot.x+=inputRot.y;
        camRot.y+=inputRot.x;
        cam.transform.rotation=Quaternion.Euler(camRot);

    }
    void OnMove(InputValue pos)
    {
        Vector2 inputPos=pos.Get<Vector2>();
        Vector3 playerPos=transform.position;
        playerPos.x+=inputPos.x;
        playerPos.z+=inputPos.y;
        rb.MovePosition(playerPos);

    }
    void OnFire()
    {
        Debug.Log("Fired");
    }
}
The new input system really simplifies the input actions and as you can see from the above script the developer, doesn’t need to check for input in the update or use an if statement that keeps scanning for input.
That’s it for this tutorial, if you have any other question then feel free to leave them in the comment box below.