We all would have studies Rigidbody in our physics textbooks. But very few would even remember it. The definition of Unity Rigidbody is slightly different to what we learnt in our physics text book. The real-world physics and game physics are little different. Especially because we get to control the game world.
If you are following our learn Unity tutorials, then this is the first step into Unity physics engine.

Watch as Video
What is a Rigidbody?
A Rigidbody is a solid body that does not deform even when force is applied to it.
Physics definition
Any game object that obeys the laws of physics is called a Rigidbody.
Unity definition
In Unity, any game object to which a force can be applied is called a Rigidbody. To make a game object into Rigidbody, you just need to add the Rigidbody component to it. Once the component is added, the motion of the game object will be under the control of Unity physics engine.
Types of Unity Rigidbody
Static
Static Rigidbody are object that are immovable and not affected by forces. To make an object into static Rigidbody just remove the Rigidbody component from it. In case of 2D, you can set the body type as static from the Rigidbody2D component. But static Rigidbody will have a collider attached to it.
Without a collider or a Rigidbody the object is not considered as physics object. Static Rigid bodies are not taken into consideration for motion in the physics calculations.
Dynamic
Any game object with a Rigidbody component that moves based on physics forces is considered as a dynamic Rigidbody. Unity’s physics engine calculates the movement of a dynamic rigidbody at every fixed time interval. Also, the trajectory of motion of a dynamic Rigidbody is calculated based on events like collision.
Kinematic
Kinematic Rigid bodies are game object that have a Rigidbody component but are set to static by checking the is kinematic option. This means that the object can be changed to dynamic Rigidbody during game play.
Unity physics engine takes in these game object for motion calculation. So, if you set a static object as Kinematic then it will affect performance.
Adding a Rigidbody Component to Game object
To add the Rigidbody component follow the steps below
- Select the player character or the game object in the Hierarchy window to which you want to add the Rigidbody component.
- Go to the Inspector window and click on Add component.
- If it’s a 3D object, then search for Rigidbody and add the component.
- If it’s a 2D object then add the Rigidbody2D component.
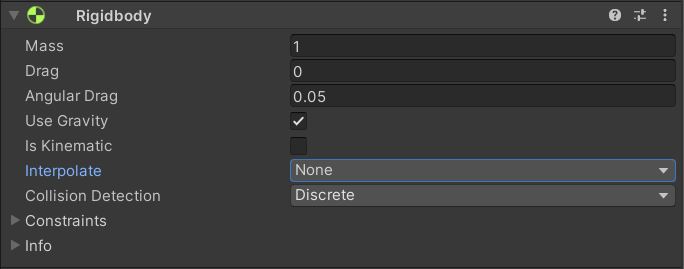
Basic Properties of Unity Rigidbody
Mass
Mass defines the mass of the Rigidbody. The gravitational force experienced by the Rigidbody, the magnitude of force required to move the object, is all dependent on the mass of the Rigidbody. Set the mass based on the size of the game object.
Drag
Drag or linear drag is the friction force that the object experiences on motion. If you want to create a moving object with high friction then you can increase the drag of the object. An object with 0 drag value will never stop if the surface on which its moving is also friction less.
Angular Drag
Angular Drag is very similar to linear drag. The only difference is this force acts in the opposite direction when you try to rotate a Rigidbody. Very useful when you are trying to create a ball with friction.
Use Gravity
By default, a Unity Rigidbody will respond to gravity forces. But if you do not want the game object to respond to gravity, then you can use this option to disable the effect of gravity on the game object.
If you want to set the gravity scale then you can go to Edit -> Project Settings -> Physics. The game object will fall from the starting position if there is no ground plane and use gravity is set to true.
Is Kinematic
This option can be used to ignore the Rigidbody from physics simulation. You can set the option to true if you don’t want the game object to act like a Rigidbody.
Interpolate
Interpolate helps smoothen the movement in Unity physics. If you are experiencing jittery movement when using Unity Rigidbody then you can use this option to smooth out the motion.
Collision Detection
This option decides, whether the collision detection is required or not. If this option is unchecked then the Rigidbody will not be used for collision calculations. Alternatively, you can also disable the collider. But in that case, the other colliders will pass through this object.
Constraints
Constraints allow you to restrict the movement or rotation of the Rigidbody in a particular axis. For example, if you have a player controller. You want the player to only rotate in the y axis then you can use constraints to restrict the rotation in x and z axes. Similarly, you can restrict the Rigidbody’s movement using the movement constraints.
Unique properties in Rigidbody2D
Most of the properties and their behaviors are the same in both Rigidbody and Rigidbody2D. But the way they are named is different. Also, Rigidbody2D works only with 2D colliders.
Body Type
Unlike in 3D Rigidbody, the is kinematic property is added inside the Body type property in Unity Rigidbody2D. You can set your body type to dynamic, static or kinematic with this property.
Use Auto Mass
This property allows you to set the mass of the game object automatically based on the size, collider and mass of the game object.
Sleeping mode
This is an optimization option only available in Rigidbody2D. The game object can be set to sleep to improve performance during the game start. It totally depends on the use of game object in your game. You can set the object to start asleep if you don’t need to perform any physics calculation on the object during game start.
Adding Force to Unity Rigidbody
Follow the steps below to add force to Rigidbody
- Add a Rigidbody and a collider component.
- Make sure the Rigidbody is not set to Kinematic.
- Create a new script called “unity_addforce” and add it to the cube.
- Copy and paste the below code to the script.
- Play the game and a force will get applied on the start of the game.
The below script, we get the Rigidbody component from the game object and apply force on it in the forward direction.
using UnityEngine;

public class unity_addforce : MonoBehaviour
{
    Rigidbody rig;
    float mag=10f;
    // Start is called before the first frame update
    void Start()
    {
        rig=GetComponent<Rigidbody>(); //get the Rigidbody component attached to the script
        rig.AddForce(Vector3.forward*mag,ForceMode.Impulse);

    }

}
You can apply a custom force by declaring a new vector and assigning the force value and direction to it.
Force Modes
- Acceleration- You can set an acceleration mode to the cube.
- Impulse- Apply a force for very small, time interval.
- Force- Works similar to impulse but applies a continuous force.
Unity Rigidbody Velocity script
There is a very simple difference between adding force and assigning velocity to a Rigidbody. Velocity basically defines the speed at which the game object will move in a particular direction. Here is the modified script to apply velocity.
using UnityEngine;

public class unity_velocity : MonoBehaviour
{
    Rigidbody rig;
    float mag=10f;
    // Start is called before the first frame update
    void Start()
    {
        rig=GetComponent<Rigidbody>();
        rig.velocity=Vector3.forward*mag;

    }


}
Movement using Unity Rigidbody
Let’s try to move a cube, which will be our Ridigbody on the surface of the plane.
For this tutorial, we will be using the default input system to move the Rigidbody on keyboard input. If you looking to use the new input system then check out our tutorial on making an FPS controller using new input system.
- Add a cube and a plane to the scene.
- Add Rigidbody component to the cube.
- Make sure collider is attached to both cube and plane.
- Make sure the Cube is above the plane and not inside it.
- Create a new script called “PlayerController” and add it to the cube.
- Copy and paste the code below and play the game.
- Move the cube using keyboard arrow keys.
using UnityEngine;

public class PlayerController : MonoBehaviour
{
    Rigidbody rb;
    float forcemag=10f;
    Vector3 movementForce=Vector3.zero;
    // Start is called before the first frame update
    void Start()
    {
        rb=GetComponent<Rigidbody>();
    }
    void FixedUpdate()
    {
        movementForce.x=Input.GetAxis("Horizontal"); //get horizontal input
        movementForce.z=Input.GetAxis("Vertical");  //get vertical input
        rb.AddForce(movementForce*forcemag);
    }

}
If you don’t want the object to rotate on movement then set the x and z axes rotation constraints in the Unity Rigidbody component.
You would have noticed that the above code uses the Fixed update method rather than the Update method. It’s a good practice to add all your physics related code inside FixedUpdate. As this method is called based on fixed time steps and would remain constant throughout all devices. You can set the physics update time by going to Edit > Settings > Time > Fixed Timestep.
FAQ on Unity Rigidbody
When to use Rigidbody?
You need to use Rigidbody for the cases listed below
- When the object needs to be affected by physics forces like gravity, friction etc.
- If Collision detection is required. In this case, only one of the colliding objects needs to be a Rigidbody.
- For creating custom character controller that uses physics to move a character.
Do we need Rigidbody for Collision?
For Unity to detect collision, both the objects need to have a collider attached to them and one of the objects should have a Rigidbody. Collision can only be detected between two Rigidbodies or one Rigidbody and a collider.
What is the difference between a Rigidbody and a Collider?
A rigid body defines the mass of the object and the constraints on movement using physics in Unity. A collider on the other hand defines the boundary of the game object. You can attach colliders of different shapes depending on the shape of your game object. You can even attach a mesh collider if the regular collider shapes don’t fit.
It’s a good practice to have the collider slightly larger than the gameobject so that two game objects don’t appear merged on collision. This brings us to the next topic in our learn series, Collision Detection in Unity.
We have covered all the basics of Unity Rigidbody. If you have any other question regarding this then feel free to leave a comment below.