Reducing build size is a commonly sort out question by many new game developers but the answers are scattered around the web and it will require some trial and error to know which will work for your game. In this tutorial, we will see how to reduce the build size of a Unity game by 90% using some simple steps that we have found to work wonders when it comes to build size.
Video Tutorial
The Build Report
Build Report contains all the details of assets that contributed to the game’s build. So, the first step will be to look at the Build Report but you need to build your game first before trying to look at the Build Report. So, follow the steps below for your Build Report.

- Build your game.
- Go to the Console window and click on the three dots at the top right.
- Open Editor Log,
- Search of Build Report.
- If you have built your game many times after starting the Unity Editor then you need to look at the last Build Report in Editor logs.
It should look something like this
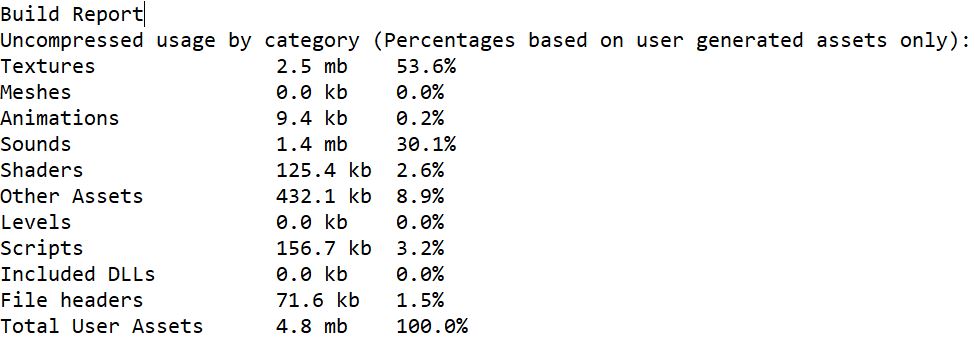
In most cases the maximum percentage of size will be taken up by the textures. So, we will first focus on reducing the texture size.
Reducing the texture size
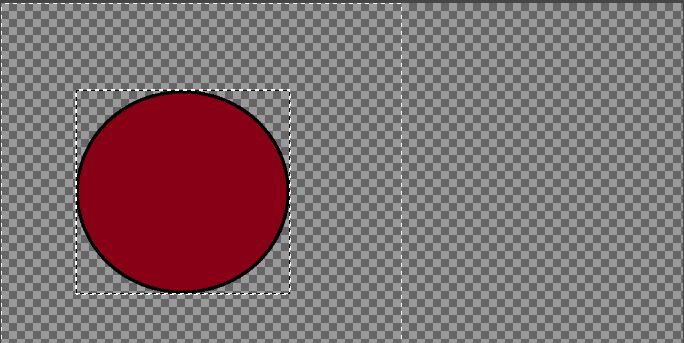
To demonstrate texture optimization let’s draw a simple circle in paint and make the background transparent and import it to Unity.
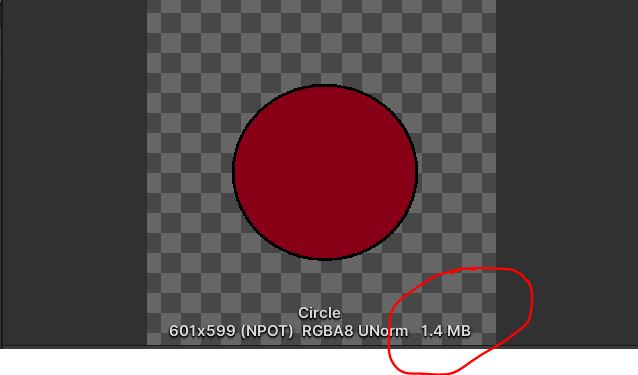
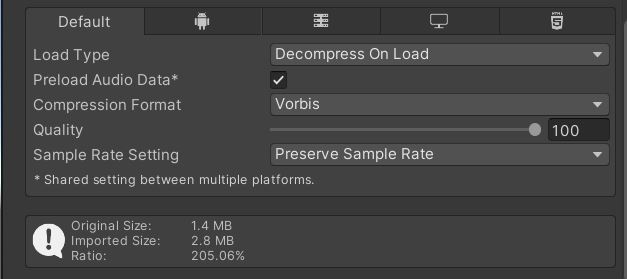
1.4MB for a small circle is not acceptable. This is without compression so let’s enable it.
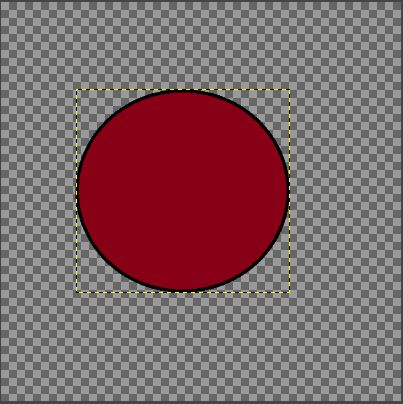
As you can see that the image size is not a multiple of 4 so you will get an error as in the image below if you enable compression.

So, lets resize the image to 600×600 pixels.
Immediately after resizing the image and enabling compression the texture size has reduced from 1.4MB to 351KB.
The POWER OF TWO(POT)
As we saw in the previous step making the image dimension a multiple of 4 can help Unity compress it. Unity can make the compression even better if you have an image dimension that is a Power of Two.
So, let’s resize the image to 512×512 pixels.
Now the image size has reduced further to 256KB.
Here is a comparison Table
| Image Type | Random NPOT image | Multiple of 4 | POT |
|---|---|---|---|
| SIZE | 1.4MB | 351KB | 256KB |
Just by resizing an image to a POT you can reduce the texture size by more than 80%.
How to resize to POT
My people get this part wrong and scale the image and make it unusable. You don’t need to scale the image. You need to increase the size of the canvas. This way the original image will be retained with an alpha background.
Let’s take the same circle for example.
Open the image in Gimp.
First let’s scale the image by going to Image>Scale. Enter in the values and see the output. For the purpose of this tutorial let enter 1024×512. This should distort the image completely.
Let’s Undo and go to Image>Canvas size and set the dimension to 1024×512. You will notice how the original image is retained and an alpha area is added to the image.
Here is a side-by-side comparison
Crunch Compression
Unity allows you to have an additional layer of compression if the images are a multiple of 4 or POT. You should see this option right below the default compression. Crunch compression are a little lossy, so if you are very particular about high quality images in your game then it’s better not to use Crunch compression.
You can enable it and check if it’s worth. Most of the time the difference in quality is very negligible. It’s worth noting that if you have a very big texture then the time to compress might be high.
Let’s check out how much space can we save with Crunch Compression for our circle. Enable crunch compression and set the Compressor Quality to 50. This is the final output.
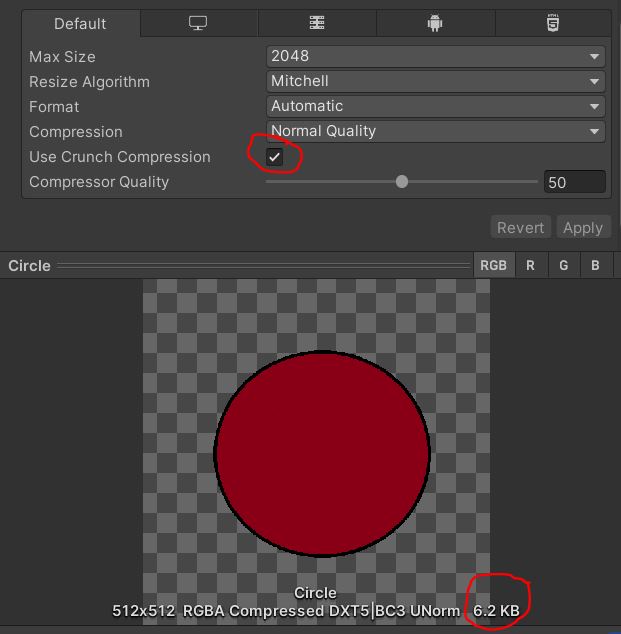
WOW, right? the image size is just 6.2KB. We have reduced a 1.4 MB image to just 6.2KB which is a reduction by 99.995%
Doing this to all your textures will reduce the build size by 90% for sure.
The audio files
Audio files needs to be optimized while recording and there is not much we can do to reduce the file size in Unity. There are a few things that we can try if you are ok with reduced quality.
You can experiment with the audio settings to reach a quality level that you are willing to sacrifice.
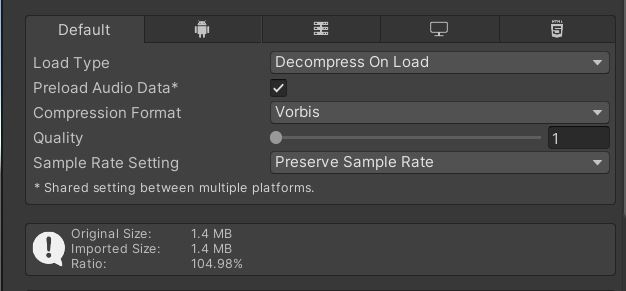
Reducing the Quality settings
The first step is to set the quality level in Unity to 1 from 100. I honestly didn’t notice any difference on an mp3 file but the import size of the sound was reduced by half.
Trimming the Audio
If your audio has breaks and pauses then you can trim them off to reduce the size. In case of background music that repeats itself, you can have a very small clip on a loop. If you are a sound designer then you will have much more control on the size when importing the audio to Unity.
Other settings that might help
The other game assets that take up more space in builds are meshes and animations. If you have not already enabled then enable compression on the mesh to optimize its size. My experience with compressing animations has been bad and I would suggest against compressing animations. But try it out if your animations are taking a lot of space in game build.