
Welcome to our comprehensive tutorial on utilizing finite state machines (FSMs) in Unity game development! In this article, we will guide you through the concept of Unity states and provide you with a step-by-step guide to implementing a powerful finite state machine system in your Unity projects. By the end of this tutorial, you will have a solid understanding of FSMs and how to use them in your Unity projects.
What are States in Unity?
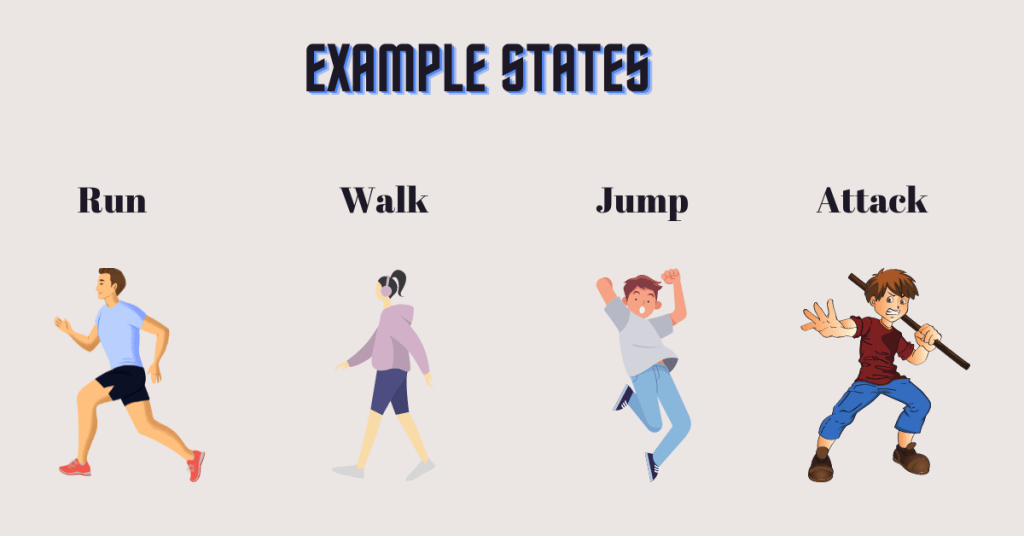
In Unity, states refer to different behaviors or conditions that an object or character can be in during gameplay. For example, in a platformer game, a character’s states could include “Idle,” “Running,” “Jumping,” “Attacking,” and “Falling.”

Each state comes with a specific set of things that the object or character can do, how it behaves, or what it looks like.
Think of states as different “modes” that the object or character can switch between. Depending on the current state, the object or character will behave and respond differently to player input or game events. It’s like changing the character’s behavior based on what’s happening in the game or what the player wants the character to do.
What is a state machine in Unity?
In Unity, a state machine is a system that helps manage and control the behavior and interactions of objects or characters in a game. It provides a way to organize and define different states and the transitions between them.
A state machine consists of two main components: states and transitions. States as we discussed earlier represent specific behaviors or conditions that an object or character can be in, such as “Idle,” “Walking,” or “Attacking.” Transitions define the conditions or triggers that cause the object or character to move from one state to another, like pressing a button or reaching a certain location.
The state machine keeps track of the current state of an object or character and ensures that the appropriate actions and behaviors are executed based on that state. It determines which state is active at any given moment and handles the transitions between states based on the defined conditions.
What is finite state machine or FSM in unity?
A Finite State Machine in Unity is a way to control how objects or characters behave in a game. It helps determine the different modes or states they can be in and how they transition between those states.
Imagine you have a character in a game. Normally, it can be in various states like “Idle,” “Running,” or “Jumping.” Each state has its own specific actions or behaviors associated with it. For example, when the character is in the “Running” state, it moves faster and plays a running animation.
A Finite State Machine is like a set of rules that govern how the character switches between these states. It defines the conditions or triggers that cause the character to move from one state to another. For instance, when the player presses a button, the character transitions from the “Idle” state to the “Jumping” state.
How does a Finite State Machine differ from state machines?
FSM is a type of state machine that has limited number of states and a pre-defined action for each state. A state machine can be any type of design. The number of states can be finite or infinite, the behavior can be deterministic or non-deterministic.
The term “state machine” can be used to describe a wide range of models and formalisms, including FSMs, Turing machines, Petri nets, and more. Each of these models has its own characteristics, capabilities, and applications.
Is Unity Animator a Finite State Machine?
Yes. Unity Animator operates on the principles of states and transitions, which are key elements of Finite State Machines. It allows you to define different animation states, such as “Idle,” “Running,” “Jumping,” or “Attacking,” and define the conditions or triggers that cause transitions between these states.
Each animation state in the Animator represents a specific animation clip or behavior that the object or character can exhibit. For example, the “Running” state might play a running animation, while the “Jumping” state plays a jumping animation.
Transitions in the Animator define the conditions under which an object or character moves from one animation state to another. These conditions can be based on variables, such as the character’s speed or input from the player, or they can be triggered by specific events or interactions within the game.
The Animator allows you to visually set up and manage these states and transitions through the Unity editor. You can specify the animations, define the conditions for transitions, and set blending parameters to create smooth transitions between animations.
How to Implement States in Unity?
There are two ways to do this
- Using Unity Animator: Unity Animator does more than just animation transition. You can add behaviors to each animation state which will act as the logic for the states in the Finite State Machine.
- Using scripts: You need to create a state machine class, individual state class and set up all the transitions and behaviors using code.
We will see how to implement State machines using both these methods in this tutorial. Before we get started with the implementation, you need to understand how the state machines logic work.
State machine logic
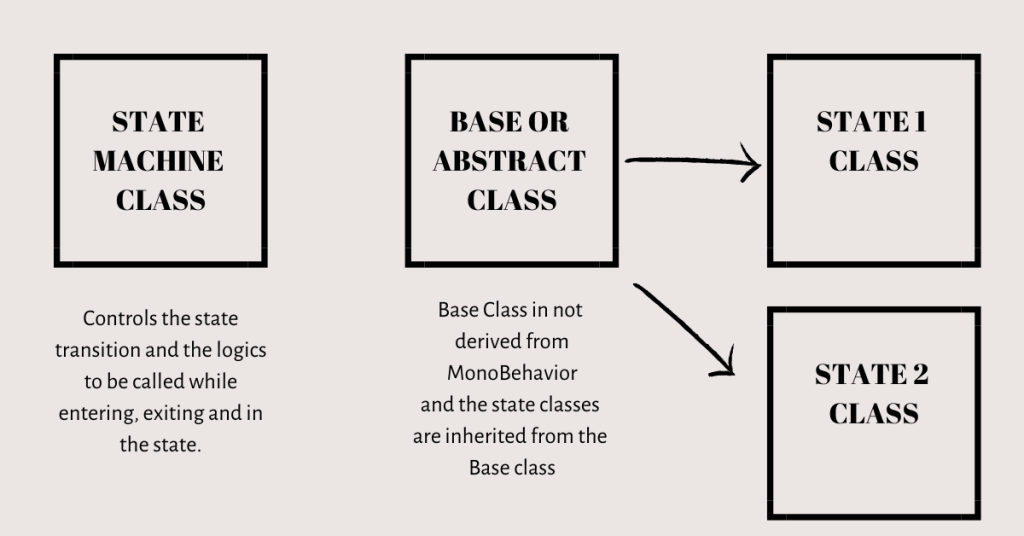
A Unity state machine consists of a state machine class, an abstract class and then the concrete class which represents the individual states.
For example, if you have a character with states like “Idle”, “Walk”, “Jump” then you will need the following classes for your state machine
- State machine class which tracks the current state, manages state transition and executes the logic of current state. This part is setup visually in case of using the Animator window.
- The base state class is just a template for the actual state classes. The abstract class will not derive from Monobehaviour. In case of using the Animator to setup the State machines, there is no requirement for the abstract class.
- Then comes the Idle, walk and Jump state classes which will derive from the abstract class. You can add these as behaviors to animation states in the animator window.
The abstract class and the state classes will have three methods inside them. The enter, Update and the Exit methods. The enter and exit methods will define the behavior of the character while entering and exiting the state. The Update method will be looped when the character is in the current state.
Implementing Finite state machine using script
Now that we understand how finite state machines work let’s take an example. We have downloaded this Knight sprite from Unity Asset Store and let’s use the Idle, run, jump and attack animation states for this tutorial.
The knight can only jump when he is in the idle state and can only attack in the jump state. Also, we will set the change the color of the sprite in every state using the FSM scripts. For the sake for this tutorial, we are keeping the FSM simple. You can add in more logic to your character like rotation and powerup depending on your requirement.
Now let’s see how to implement this using state machines
- Create a Script for the Finite State Machine:
- Create a new C# script (e.g., KnightFSM.cs) and attach it to your knight character in Unity.
- In this script, you’ll define the states and their transitions using an FSM approach.
- Define State Enum:
- Declare an enum to represent the different animation states of the knight. Add this enum inside the KnightFSM class in the KnightFSM.cs script:
using UnityEngine;
using System.Collections.Generic;

public class KnightFSM : MonoBehaviour
{
    public enum KnightState
    {
       Idle,
       Run,
       Jump,
       Attack
    }

}
- Create State Classes:
- Create individual state classes for each animation state (IdleState.cs, RunState.cs, JumpState.cs, AttackState.cs).
- Each state class should inherit from a base state class (BaseState.cs) and implement its required methods, such as Enter(), Update(), and Exit().
Code for Abstract base class
The base class is not directly used in our game. It acts as the parent class for our state class.
public abstract class BaseState
{
    protected KnightFSM fsm;

    public BaseState(KnightFSM fsm)
    {
        this.fsm = fsm;
    }

    public abstract void Enter();
    public abstract void Update();
    public abstract void Exit();
}
Code for Individual classes
Idle Class
using UnityEngine;

public class IdleState : BaseState
{
    public IdleState(KnightFSM fsm) : base(fsm)
    {
    }

    public override void Enter()
    {
        // Play the idle animation
        fsm.Animator.Play("HeroKnight_Idle");
    }

    public override void Update()
    {
        // Check conditions for transitioning to other states
        if (fsm.IsRunning)
        {
            fsm.ChangeState(KnightFSM.KnightState.Run);
        }
        else if (fsm.IsJumping)
        {
            fsm.ChangeState(KnightFSM.KnightState.Jump);
        }
    }

    public override void Exit()
    {

    }
}
Run Class
using UnityEngine;

public class RunState : BaseState
{
    public RunState(KnightFSM fsm) : base(fsm)
    {
    }

    public override void Enter()
    {
        // Play the Run animation
        fsm.Animator.Play("HeroKnight_Run");
        fsm.sprite.color=Color.yellow;
    }

    public override void Update()
    {
        // Check conditions for transitioning to other states
        if (!fsm.IsRunning)
        {
            fsm.ChangeState(KnightFSM.KnightState.Idle);
        }

    }

    public override void Exit()
    {
        fsm.sprite.color=Color.white;
    }
}
Jump Class
using UnityEngine;

public class JumpState : BaseState
{
    public JumpState(KnightFSM fsm) : base(fsm)
    {
    }

    public override void Enter()
    {
        // Play the Jump animation
        fsm.Animator.Play("HeroKnight_Jump");
        fsm.sprite.color=Color.green;
    }

    public override void Update()
    {
        // Check conditions for transitioning to other states
        if (fsm.IsAttacking)
        {
            fsm.ChangeState(KnightFSM.KnightState.Attack);
        }
        else if (!fsm.IsJumping)
        {
            fsm.ChangeState(KnightFSM.KnightState.Idle);
        }
    }

    public override void Exit()
    {
        fsm.sprite.color=Color.white;
    }
}
Attack Class
using UnityEngine;

public class AttackState : BaseState
{
    public AttackState(KnightFSM fsm) : base(fsm)
    {
    }

    public override void Enter()
    {
        // Play the Attack animation
        fsm.Animator.Play("HeroKnight_Attack1");
        fsm.sprite.color=Color.red;
    }

    public override void Update()
    {
        // Check conditions for transitioning to other states
        if (!fsm.IsAttacking)
        {
            fsm.ChangeState(KnightFSM.KnightState.Jump);
        }

    }

    public override void Exit()
    {
        fsm.sprite.color=Color.white;
    }
}- Now add the required parameter and control to the KnightFSM class.We also need to get user input to change the transition parameters. The same is taken care inside the Update function of KnightFSM script. Here is the final KnightFSM script
using UnityEngine;
using System.Collections.Generic;

public class KnightFSM : MonoBehaviour
{
    public enum KnightState
    {
       Idle,
       Run,
       Jump,
       Attack
    }
    public Animator Animator { get; private set; }
    public SpriteRenderer sprite { get; private set; }
    public KnightState CurrentState { get; private set; }
    public bool IsRunning { get; set; }
    public bool IsJumping { get; set; }
    public bool IsAttacking { get; set; }


    private Dictionary<KnightState, BaseState> stateDictionary;


    private void Awake()
    {
        Animator = GetComponent<Animator>();
        sprite=GetComponent<SpriteRenderer>();

        // Initialize the state dictionary
        stateDictionary = new Dictionary<KnightState, BaseState>
        {
            { KnightState.Idle, new IdleState(this) },
            { KnightState.Run, new RunState(this) },
            { KnightState.Jump, new JumpState(this) },
            { KnightState.Attack, new AttackState(this) }
        };
    }

    private void Start()
    {
        // Set the initial state to Idle
        ChangeState(KnightState.Idle);
    }

    public void ChangeState(KnightState newState)
    {
        // Exit the current state (if any)
        if (stateDictionary.ContainsKey(CurrentState))
        {
            stateDictionary[CurrentState].Exit();
        }

        // Update the current state
        CurrentState = newState;

        // Enter the new state
        if (stateDictionary.ContainsKey(newState))
        {
            stateDictionary[newState].Enter();
        }
    }

    private void Update()
    {
        // Update the current state
        if (stateDictionary.ContainsKey(CurrentState))
        {
            stateDictionary[CurrentState].Update();
        }
        if(Input.GetKeyDown(KeyCode.Space))
        {
            IsJumping=!IsJumping;
        }
        if(Input.GetKeyDown(KeyCode.A))
        {
            IsAttacking=!IsAttacking;
        }
        if(Input.GetKeyDown(KeyCode.R))
        {
            IsRunning=!IsRunning;
        }
    }
}
- Set Up the Animator Controller:
- Create an Animator Controller asset (e.g., “KnightAnimatorController”) and set up the animation states. The transitions and the conditions required are handled by the KnightFSM script.
- Here is how the Animator window will look

With this implementation, the KnightFSM script acts as the central control for managing the knight’s animation states and transitions. The individual state classes handle the logic for entering, updating, and exiting each state, including the animation playback.
The above example does only the transition and color change between states but you can add more logics to the Enter, Update and Exit methods of each state to define the behavior of the character in that state.
Pro Tip: If you making the transition using the Animator window then the Exit and the Enter functions will not be called.
FSM with Unity Animator and behavior scripts
We can implement the above Finite state machine using Animator window in a much simpler way. The transition between states can be set up visually and the behavior of the character in each state can be implemented using a simple script for each state. If you are totally new to animation in Unity, please read our Getting started Guide with Unity Animation and Animator before proceeding.
Setting up the transition
Let’s add the required animation clips to the Animator window and set up the transition. The parameters that we set in the KnightFSM script will now be inside the Animator window. One advantage of adding parameter using Animator window is we can use the Trigger Datatype.
Here is how the Animation window looks like

Now we need a simple script to set the animation properties when the corresponding input is received.
using UnityEngine;

public class StateTransition : MonoBehaviour
{
    Animator animtor;
    // Start is called before the first frame update
    void Start()
    {
        animtor=GetComponent<Animator>();
    }
    void Update()
    {
        if(Input.GetKeyDown(KeyCode.Space))
        {
            animtor.SetTrigger("IsJumping");
        }
        if(Input.GetKeyDown(KeyCode.A))
        {
            animtor.SetTrigger("IsAttacking");
        }
        if(Input.GetKeyDown(KeyCode.R))
        {
            animtor.SetTrigger("IsRunning");
        }
    }

}
To set the color for each state, we can use the behavior script of each state. To add a behavior script, follow the steps below
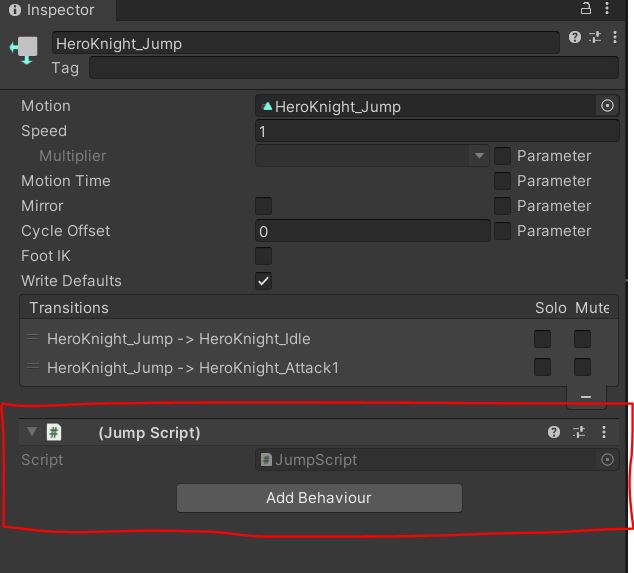
- Select the Unity state on the Animator window.
- Go to the inspector and click on Add Behavior.
- This will add a script to the Animation State. Let’s add one for Run, Jump and Attack and let’s call them RunScript, JumpScript, AttackScript
If you open any of these scripts, it will be different that the regular Unity Scripts. There will be a bunch of commented functions. If you take a closer look, they are very similar to the Enter, Update and Exit functions we used in our state Finite state machine scripts.
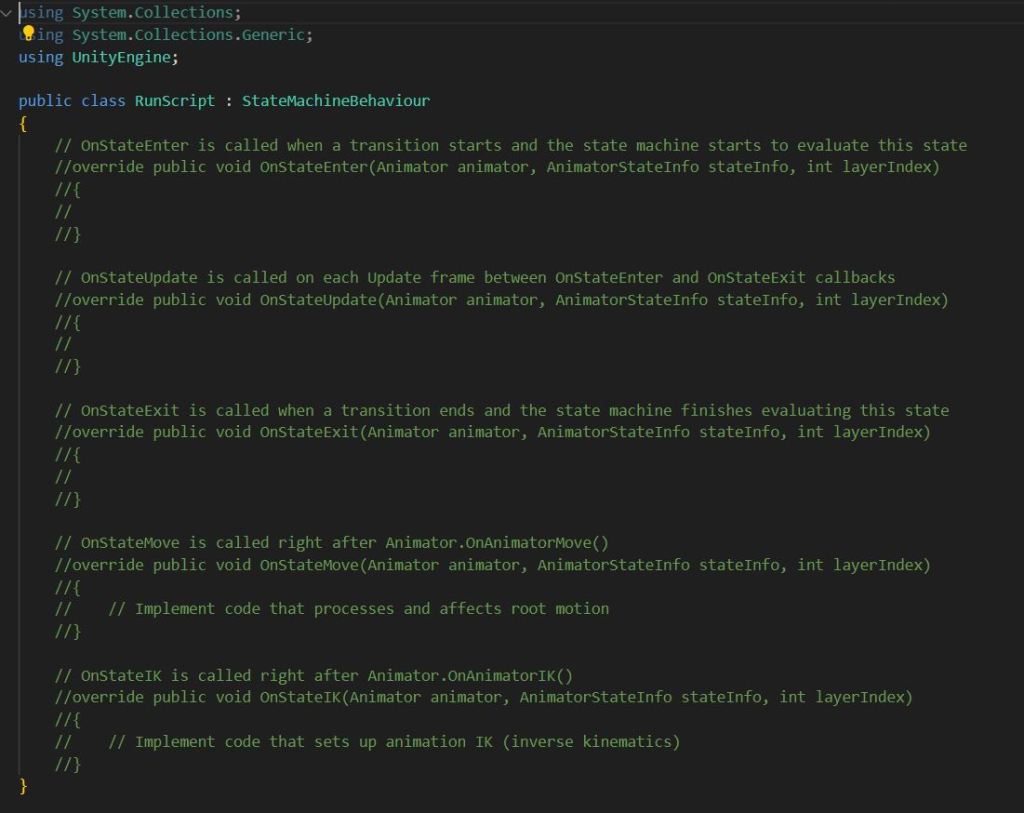
We need only the OnStateEnter and OnStateExit functions to set and reset the color.
Here is the script for the Attack state.
using UnityEngine;

public class AttackScript : StateMachineBehaviour
{
    // OnStateEnter is called when a transition starts and the state machine starts to evaluate this state
    override public void OnStateEnter(Animator animator, AnimatorStateInfo stateInfo, int layerIndex)
    {
        animator.GetComponent<SpriteRenderer>().color=Color.red;
    }


    // OnStateExit is called when a transition ends and the state machine finishes evaluating this state
    override public void OnStateExit(Animator animator, AnimatorStateInfo stateInfo, int layerIndex)
    {
        animator.GetComponent<SpriteRenderer>().color=Color.white;
    }


}
We have added similar code for the Run and the Jump states. If we play the game now, the player will transition and change color as per our logic.
Implementing Finite State machine with Unity Animator is much simpler and easy to understand for beginners.
Advantages of Finite State Machine design
The same can be accomplished without an FSM. Here are the advantages of using an FSM design.
- We don’t have to constantly check which state we are in to implement the logic. This improves the performance of the game. For example, if you want to spawn stronger enemy based on the player state then you need to constantly check the player state to spawn enemies. This can be avoided with FSM.
- An FSM helps to organize game logic into separate states, making it easier to understand and maintain. Each state represents a specific behavior or set of actions, simplifying the overall structure of the code.
- FSMs simplify the process of transitioning between different states, allowing for smooth and controlled gameplay flow. Transitions can be triggered based on specific conditions or events.
Where is FSM used in game development?
FSM can be used in multiple scenarios depending on how the developer decides. Here are the major use cases of an FSM in games
- Character AI: FSMs are frequently utilized to control the artificial intelligence (AI) of non-player characters (NPCs) in games. Each NPC’s behavior can be defined by a set of states and transitions, representing actions, reactions, and decision-making processes. For example, an NPC’s FSM might include states for idle, chasing, attacking, retreating, and more. Transitions between these states can be triggered by specific events or conditions, such as detecting the player or reaching a certain health threshold.
- Game Object Interaction: FSMs can be employed to govern the behavior of interactive objects within a game world. For instance, puzzle elements, doors, switches, or other interactive elements can be modeled using an FSM. The states of the FSM represent the object’s various states (e.g., locked, unlocked, activated), and transitions dictate how the object responds to player actions or other events.
In this article, we explored the concept of states and their significance in game development. We discussed how states can be implemented using a Finite State Machine (FSM) approach.
Both approaches that we discussed, have their advantages and can be chosen based on the specific requirements and preferences of the project. Scripting provides flexibility and fine-grained control, while the Animator window offers a more visual and intuitive workflow.
If you have any other question or like us to cover more on this topic, please leave a comment below.