In our last tutorial on enemy AI, we learnt how to create a Navmesh and how to make the enemy follow the player. In this tutorial, we will see how to add off mesh links so that the player or enemy can jump over gaps in your plane.
If you are totally new to Navmesh check out our previous tutorial on making an enemy AI in Unity.

For the purpose of this tutorial, we will not be adding any obstacles.
What is Off mesh Link in Unity navigation?
Off mesh link creates a path to move between two Navmesh or different points of the same Navmesh that are separated by empty space.
For example, if you want the player to jump over ditches in your game or you want the player to jump to a slab that’s at a different height than your platform you can use off mesh links.
The image below explains Unity off mesh link examples.

Generating off mesh links
There are two ways to generate off mesh links. The first way is to generate them automatically and the next option is to create a custom off mesh link manually.
Creating off mesh link automatically
There are some limitations to off mesh links when generated automatically.
- For jump links both your Navmesh should be at the same elevation.
- For drop links the bottom surface should be directly below the top one or it should be a part of the same Navmesh.
To generate the off mesh links
- Select the planes you want the player to move across.
- Go to Windows>AI>Navigation.
- In the navigation window select the object tag.
- Set both the planes as Navigation static and check Generate OffMeshLinks.
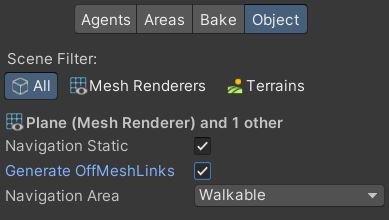
- In the Bake tab set the jump and drop distance.

- Click on Bake.
- Your Navmesh should be generated with the off mesh link as in the image below.

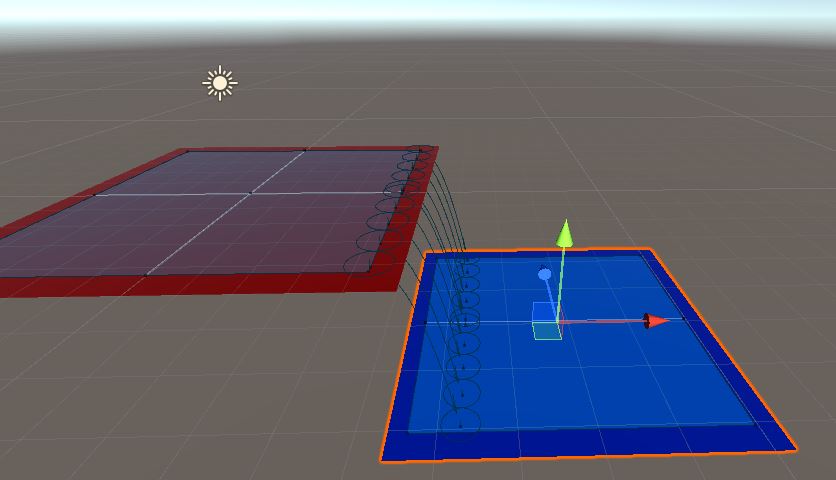
As you can see in the image above, Unity generated multiple links between planes and uses the shortest path.
Creating off mesh link Manually
Creating off Mesh link manually lets us overcome the limitations of automatic off mesh links. You can place them wherever you want.
To create a manually off mesh link, you need two gameobjects. They can be empty or you can have a simple model to represent the mesh link.
Let’s add two empty game objects to the scene. Place one on each surface. Make sure the elevation of the gameobject is the same as the surface.
Let’s name them link_start and link_end. Set them as children of the respective surface and reset the transform. This will make sure that the points are on the surface.

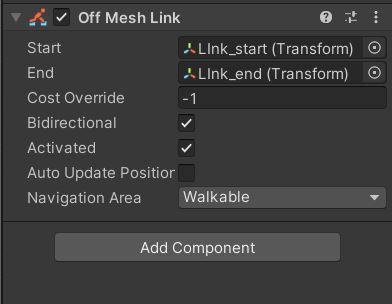
Select Link_start and add the “Off Mesh Link” component to it.
Drag and drop Link_start and Link_end to Start and End parameters of Off Mesh Link component.
If you want the player to move in both directions then select bidirectional.
If you are planning to update the link’s start and end positions during runtime then check the Auto Update Position check box.
That’s it you have created an off mesh link. You need to bake the Navmesh and check if both your link positions have circles. The circles represent that the links are properly connected.
If you don’t see the circles then the agent will not traverse the link. Try moving your link start and end position up and down until you see the circles.

Now you have successfully learnt to create Off Mesh Links. If you have any other questions regarding the same then leave them in the comment section below.