
Counter Strike: Condition Zero, was the main the reason I developed interest for games. This slowly turned into a passion, and now I am a game developer. Creating an FPS controller is the first thing I tried to learn when getting started. But it was so overwhelming, that I gave up and went back to the basics. In this tutorial, we will start from the very basics and make a working FPS game.
A little experience with Unity will help you understand this tutorial better and we will not be covering the basics like Unity installation in this tutorial. So, if you are completely new to Unity, I would suggest you to check out our learn Unity pathway before proceeding.

Video Tutorial
Setting Up the Scene
Create a new 3D project for this tutorial and import the free assets listed below for the arena and weapons.
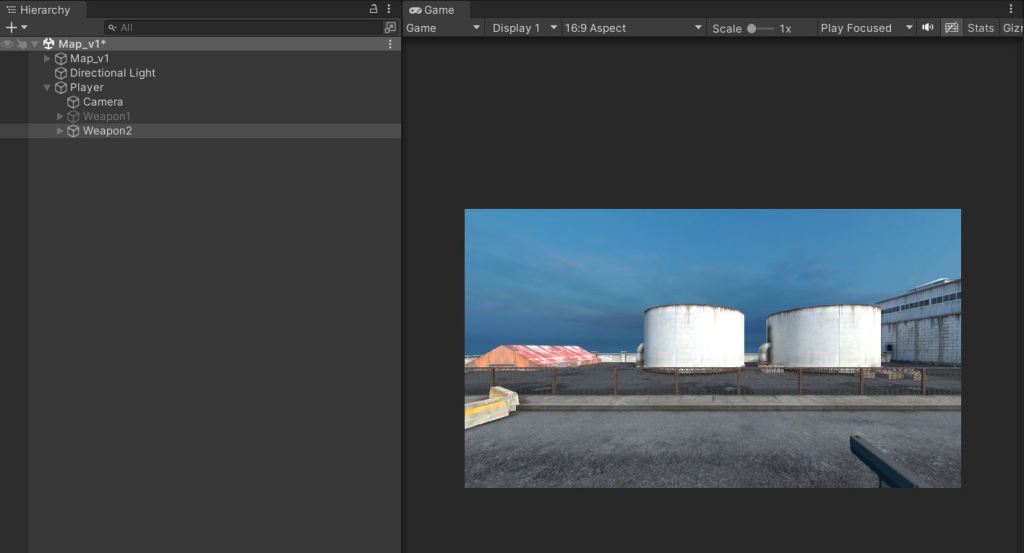
Under the Industrial set, let’s use the Map_v1 scene. The scene has baked lighting and some particle effects. Let’s get rid of them and add our own directional light and camera.
The scene inside the package is not setup properly, so let’s Move things up and down to create an arena that is playable.
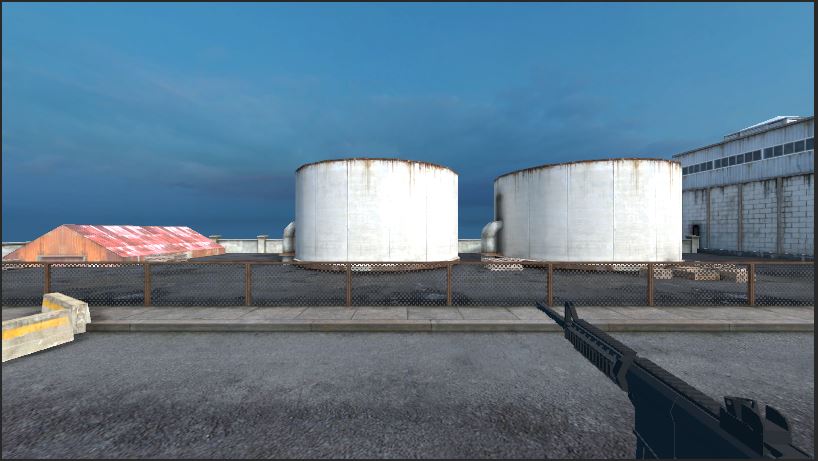
Here is how my FPS arena looks like.

Setting Up the FPS camera view
Add an empty game object to your scene and name it as “Player”. Add a capsule collider to it and set the height of the collider to represent a human. Then add a rigid body component to the player.
Adjust the position of the Player game object so that it looks like the player is standing on the ground. There should be a small gap between the capsule collider and the ground. Otherwise, the player may fall through the ground on game start.
Adjust the camera height, so that it’s little above the ground level and set the camera as the child of the Player game object. The camera position should be, where the head of the player would be. Here is how the player should look like.

Adding Weapons to camera view
Add an empty game object as a child to the Player and name it as “Weapon1”. Add the Weapon prefab as the child of “Weapon1”. Adjust the scale, position and rotation of the weapon to look like the one in the image below. If you like to improve the looks, you can also add a hand to hold the gun.
You can add multiple weapons too. Let’s add a pistol to the game. Duplicate the Weapon1 game object and rename it to Weapon2. Replace the large gun with a pistol under Weapon 2. Adjust the position, scale, rotation until you are satisfied with the view.
Make sure only one weapon is active at a time.
Next, we will add a crosshair for aiming. We will use an UI image for this. Set the position to center of the screen and adjust the size to your requirements. By default, the anchor is at the center. If not, set the anchor to the center of the screen.
Add a UI image to the scene and drag and drop the crosshair of your choice from the asset we imported earlier. Adjust the size and color to your requirement.
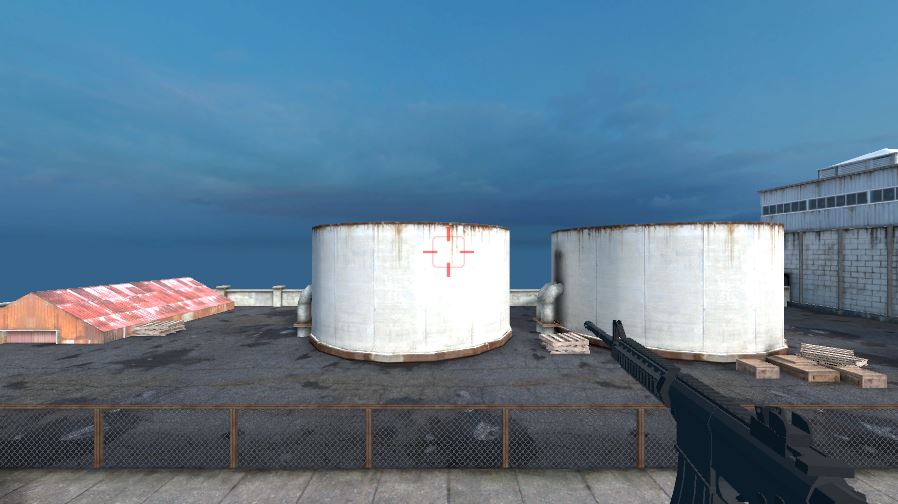
Here is how my scene looks after adding a crosshair.
Moving the player
We will be using the old input system for this tutorial. If you want to use the new input system, then check out our tutorial for creating an FPS controller using new input system.
Select the player game object and add a new script to it. Let’s call the script “PlayerController”. We will use the Input.GetAxis function to get the arrow key input and add velocity to the player. We will use a float variable to optimize the movement speed.
Here is the script for reference.
using UnityEngine;

public class PlayerController : MonoBehaviour
{
    float xforce;
    float zforce;
    [SerializeField]float moveSpeed=5;
    Rigidbody rb;

    void Start()
    {
        rb=GetComponent<Rigidbody>();
    }

    void Update()
    {
         PlayerMovement();
    }

   void PlayerMovement()
    {
        xforce=Input.GetAxis("Horizontal")*moveSpeed;
        zforce=Input.GetAxis("Vertical")*moveSpeed;
        rb.velocity=transform.forward*zforce+transform.right*xforce;
    }

}
You can change the “moveSpeed” variable in the above script to control the player movement speed.
Rotating the player with Mouse
Let’s Update the PlayerController script to take in the mouse movement and apply that to the player rotation. We need to add some constraints for this.
- Player should rotate only in the y axis.
- While rotating the player view along the X axis, we will rotate the camera and not the player.
- We will make the weapons, child of the camera, so that they rotate with it.
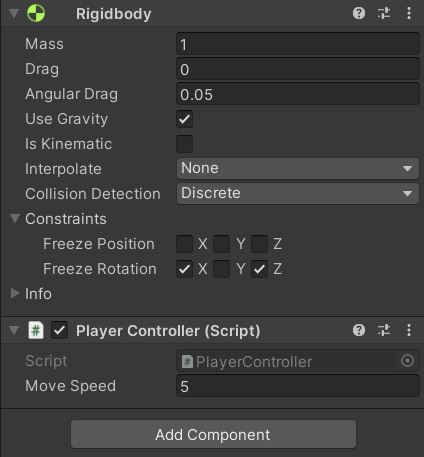
To constrain the player rotation along the X and Z axes, let’s use the rigid body component and set the constraints as shown in the image below.
To make the player look around. We will update the player y rotation based on the mouse horizontal movement and camera x rotation based on vertical movement. We also need to clamp the camera rotation along the x axis, otherwise the player will be able to see upside down.
void LookAround()
    {
        cameraRot=cam.transform.rotation.eulerAngles;
        cameraRot.x+=-Input.GetAxis("Mouse Y")*lookSpeed;
        cameraRot.x=Mathf.Clamp((cameraRot.x <= 180) ? cameraRot.x : -(360 - cameraRot.x),-80f,80f);
        cam.transform.rotation=Quaternion.Euler(cameraRot);
        playerRot.y=Input.GetAxis("Mouse X")*lookSpeed;
        transform.Rotate(playerRot);

    }
If you are confused with the Mathf.Clamp statement, we need to subtract the angle from 360 to get negative angles.
Making the FPS player jump
The last part of player movement script is the jump. We are going to check if the player is on the ground and add an upward force to make the player jump when the space bar is pressed. For a more details, you can check out our character jump tutorial.
In our earlier movement script, when setting the velocity, the Y component is zero. This will interfere with the jump. We can solve the issue by adding a component for velocity in the y direction.
using System;
using UnityEngine;

public class PlayerController : MonoBehaviour
{
    float xforce;
    float zforce;
    Vector3 playerRot;
    Vector3 cameraRot;
    [SerializeField]float moveSpeed=2;
    [SerializeField]float lookSpeed=2;
    [SerializeField]GameObject cam;
    Rigidbody rb;
    [SerializeField]Vector3 boxSize;
    [SerializeField]float maxDistance;
    [SerializeField]LayerMask layerMask;
    [SerializeField]float jumpForce=3;

    void Start()
    {
        rb=GetComponent<Rigidbody>();
    }

    void Update()
    {
        PlayerMovement();
        LookAround();
        if(GroundCheck() && Input.GetKeyDown(KeyCode.Space))
        {
           rb.AddForce(transform.up*jumpForce);
           Debug.Log("Player jumped");
        }

    }

    void LookAround()
    {
        cameraRot=cam.transform.rotation.eulerAngles;
        cameraRot.x+=-Input.GetAxis("Mouse Y")*lookSpeed;
        cameraRot.x=Mathf.Clamp((cameraRot.x <= 180) ? cameraRot.x : -(360 - cameraRot.x),-80f,80f);
        cam.transform.rotation=Quaternion.Euler(cameraRot);
        playerRot.y=Input.GetAxis("Mouse X")*lookSpeed;
        transform.Rotate(playerRot);

    }

    void PlayerMovement()
    {
        xforce=Input.GetAxis("Horizontal")*moveSpeed;
        zforce=Input.GetAxis("Vertical")*moveSpeed;
        rb.velocity=transform.forward*zforce+transform.right*xforce+transform.up*rb.velocity.y;
    }
     void OnDrawGizmos()
    {
        Gizmos.color=Color.red;
        Gizmos.DrawCube(transform.position-transform.up*maxDistance,boxSize);
    }
    bool GroundCheck()
    {
        if(Physics.BoxCast(transform.position,boxSize,-transform.up,transform.rotation,maxDistance,layerMask))
        {
            return true;
        }
        else
        {
            return false;
        }
    }

}
We are using the OnDrawGizmos() to visually check the boxcast. You can adjust the box size to be within the player bounds and the max distance so that the box is just outside the player. If your player is not able to jump, try increasing the jump force to a large value.
You don’t need the OnDrawGizmos() after you have adjusted the values and the player is able to properly ground check. You can remove it from your code.
Shooting mechanics
We will be using Raycast for shooting. Because, bullet spawning and destroying will lead to lots of garbage value and collision detection at high speed will become more performance expensive. If you want to use bullets, you can check out our tutorial on bullet physics in Unity.
We will shoot a ray on mouse click, from the center of the camera in the direction the player is looking. If we hit something that is not an enemy, we will spawn a bullet hole and if it’s an enemy, we will destroy it.
We also set a fire rate, to fire continuously at regular intervals when mouse is held down.
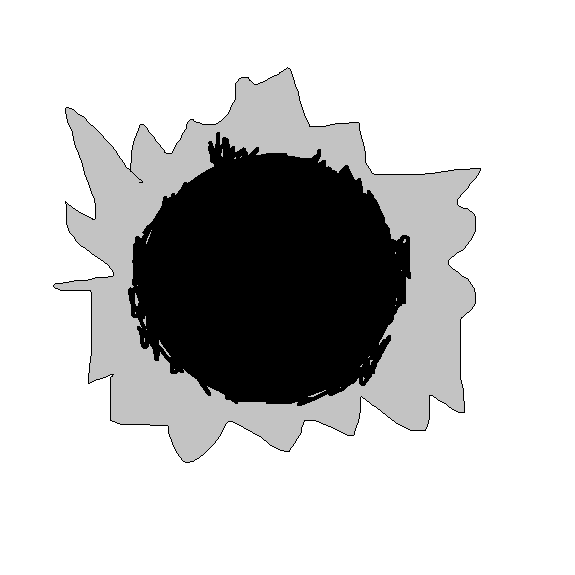
Before proceeding with the script, we are going to need a prefab for the bullet hole. Add a 3D plane to your scene and assign a new material to it. Assign a bullet hole image to the albedo of the material and set the render type of cutout. Here is the bullet hole image made in paint.
using System;
using UnityEngine;

public class PlayerController : MonoBehaviour
{
    float xforce;
    float zforce;
    Vector3 playerRot;
    Vector3 cameraRot;
    [SerializeField]float moveSpeed=2;
    [SerializeField]float lookSpeed=2;
    [SerializeField]GameObject cam;
    Rigidbody rb;
    [SerializeField]Vector3 boxSize;
    [SerializeField]float maxDistance;
    [SerializeField]LayerMask layerMask;
    [SerializeField]float jumpForce=3;
    [SerializeField]GameObject bullethole;
    RaycastHit hit;
    [SerializeField]float fireRate=0.1f;
    bool canFire=true;


    void Start()
    {
        rb=GetComponent<Rigidbody>();
    }

    void Update()
    {
        PlayerMovement();
        LookAround();
        if(GroundCheck() && Input.GetKeyDown(KeyCode.Space))
        {
           rb.AddForce(transform.up*jumpForce);
           Debug.Log("Player jumped");
        }
        if(Input.GetMouseButton(0)&& canFire)
        {
            Physics.Raycast(cam.transform.position,cam.transform.forward,out hit, 300f);
            if(hit.collider!=null && hit.collider.CompareTag("Enemy"))
            {
                Destroy(hit.collider.gameObject);
            }
            else if(hit.collider!=null)
            {
                GameObject bullet=Instantiate(bullethole,hit.point,Quaternion.FromToRotation(Vector3.up,hit.normal));

            }
            canFire=false;
            Invoke("FireRateReset",fireRate);

        }

    }

    void FireRateReset()
    {
        canFire=true;
    }

    void LookAround()
    {
        cameraRot=cam.transform.rotation.eulerAngles;
        cameraRot.x+=-Input.GetAxis("Mouse Y")*lookSpeed;
        cameraRot.x=Mathf.Clamp((cameraRot.x <= 180) ? cameraRot.x : -(360 - cameraRot.x),-80f,80f);
        cam.transform.rotation=Quaternion.Euler(cameraRot);
        playerRot.y=Input.GetAxis("Mouse X")*lookSpeed;
        transform.Rotate(playerRot);

    }

    void PlayerMovement()
    {
        xforce=Input.GetAxis("Horizontal")*moveSpeed;
        zforce=Input.GetAxis("Vertical")*moveSpeed;
        rb.velocity=transform.forward*zforce+transform.right*xforce+transform.up*rb.velocity.y;
    }
     void OnDrawGizmos()
    {
        Gizmos.color=Color.red;
        Gizmos.DrawCube(transform.position-transform.up*maxDistance,boxSize);
    }
    bool GroundCheck()
    {
        if(Physics.BoxCast(transform.position,boxSize,-transform.up,transform.rotation,maxDistance,layerMask))
        {
            return true;
        }
        else
        {
            return false;
        }
    }

}
Sounds and effects
Now we have a fully functional FPS character without sounds and effects. So, let’s add some sound and visual effects for gun fire.
For this tutorial, I am using a free door slam sound from freesound.org. It’s under creative common license. Go ahead and download it. To play the sound, add an audio source to the player and assign the sound clip. Make sure to uncheck play on awake.
Get the audio source component in the Start() and play the audio after Raycast. You can find the script in the end of this section.
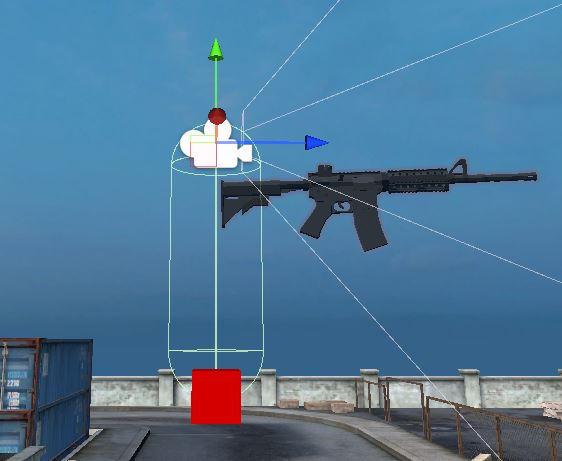
For the visual effects, we will use a particle system. Create a new particle system and set the position to the tip of the weapon. Change the particle system properties as shown in the image below. Make sure to uncheck play on awake.
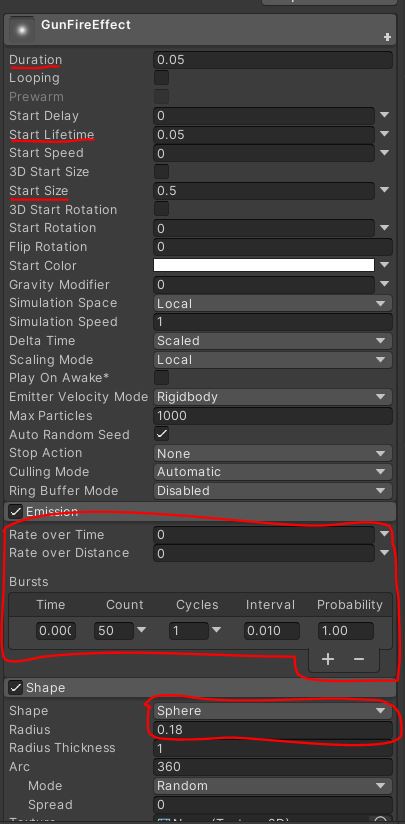
Set the color to orange or yellow depending on your requirement. Now we will use the script to play the effect on raycast.
Final FPS player controller script
using System;
using UnityEngine;

public class PlayerController : MonoBehaviour
{
    float xforce;
    float zforce;
    Vector3 playerRot;
    Vector3 cameraRot;
    [SerializeField]float moveSpeed=2;
    [SerializeField]float lookSpeed=2;
    [SerializeField]GameObject cam;
    Rigidbody rb;
    [SerializeField]Vector3 boxSize;
    [SerializeField]float maxDistance;
    [SerializeField]LayerMask layerMask;
    [SerializeField]float jumpForce=3;
    [SerializeField]GameObject bullethole;
    RaycastHit hit;
    [SerializeField]float fireRate=0.1f;
    bool canFire=true;
    AudioSource aud;
    [SerializeField] ParticleSystem gunfire;


    void Start()
    {
        rb=GetComponent<Rigidbody>();
        aud=GetComponent<AudioSource>();
    }

    void Update()
    {
        PlayerMovement();
        LookAround();
        if(GroundCheck() && Input.GetKeyDown(KeyCode.Space))
        {
           rb.AddForce(transform.up*jumpForce);
           Debug.Log("Player jumped");
        }
        if(Input.GetMouseButton(0)&& canFire)
        {
            Physics.Raycast(cam.transform.position,cam.transform.forward,out hit, 300f);
            aud.Play();
            gunfire.Play();
            if(hit.collider!=null && hit.collider.CompareTag("Enemy"))
            {
                Destroy(hit.collider.gameObject);
            }
            else if(hit.collider!=null)
            {
                GameObject bullet=Instantiate(bullethole,hit.point,Quaternion.FromToRotation(Vector3.up,hit.normal));

            }
            canFire=false;
            Invoke("FireRateReset",fireRate);

        }

    }

    void FireRateReset()
    {
        gunfire.Stop();
        canFire=true;
    }

    void LookAround()
    {
        cameraRot=cam.transform.rotation.eulerAngles;
        cameraRot.x+=-Input.GetAxis("Mouse Y")*lookSpeed;
        cameraRot.x=Mathf.Clamp((cameraRot.x <= 180) ? cameraRot.x : -(360 - cameraRot.x),-80f,80f);
        cam.transform.rotation=Quaternion.Euler(cameraRot);
        playerRot.y=Input.GetAxis("Mouse X")*lookSpeed;
        transform.Rotate(playerRot);

    }

    void PlayerMovement()
    {
        xforce=Input.GetAxis("Horizontal")*moveSpeed;
        zforce=Input.GetAxis("Vertical")*moveSpeed;
        rb.velocity=transform.forward*zforce+transform.right*xforce+transform.up*rb.velocity.y;
    }
     void OnDrawGizmos()
    {
        Gizmos.color=Color.red;
        Gizmos.DrawCube(transform.position-transform.up*maxDistance,boxSize);
    }
    bool GroundCheck()
    {
        if(Physics.BoxCast(transform.position,boxSize,-transform.up,transform.rotation,maxDistance,layerMask))
        {
            return true;
        }
        else
        {
            return false;
        }
    }

}
Now let’s add some enemies and test out our game. Make sure you tag the enemy game object as Enemy. Try it out and if you have any other question, feel free to leave a comment below.
Thanks for this detailed info..