Unity Raycast is a very handy function and can be used for many situations like finding game objects, interacting with objects, shooting, path detection and more in game development. That is why this tutorial is part of our comprehensive resource to learn Unity.
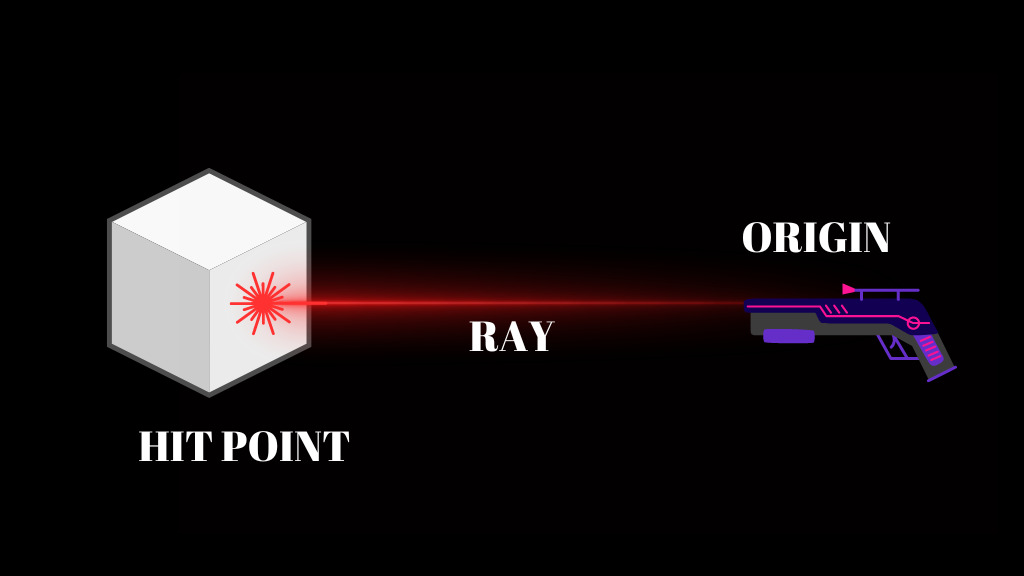
Raycasting is a technique that simulates the behavior of a virtual ray or beam in the game world. The Raycast function in Unity Casts a Ray from the origin in a specified direction and returns true if it hits a gameobject. Raycast uses mathematical variables like position of the object, range etc. to make this possible. You can also ignore objects using the Raycast function.

Raycast can be used for both 2D and 3D games in Unity. In this tutorial, we will see what is Raycast in Unity and how you can use them effectively in games.
Basics of Raycasting in Unity
Raycast() is a part of Unity physics engine and can interact only with gameobjects that have a collider component.
Syntax
Physics.Raycast(transform.position, Vector3.forward, out hit, Mathf.Infinity, layerMask)Parameters of Raycast()
- First parameter is the starting point of the ray.
- Second parameter is the direction of Ray.
- Third parameter is the output parameter containing array of hit colliders.
- Fourth parameter is the length of Ray.
- Fifth parameter is the layermask, this specifies which layers to include or exclude.
The Physics.Raycast function casts a new ray and returns a Boolean, which is true if the ray hit a game object. Physics.Raycast will work with both the old and new input system.
Alternative syntax
Physics.Raycast(ray, out hit, Mathf.Infinity, layerMask)Where Ray contains the origin and direction of the raycast. You can define a new ray as shown below
Ray ray = new Ray(transform.position, transform.forward);Thing to know about Raycast in Unity
You need to know about a few components before making a proper Physics.Raycast.
- Ray- Datatype containing the origin and direction for the raycast.
- RaycastHit – this variable type is used to store the information received from the Raycast.
- LayerMask- this is used to mask one particular layer you want the ray to interact or ignore.
- Range – this specifies the range up to which the ray will travel. It is always a good to specify a range, as it helps in performance.
Now that we know the basics, let’s see some examples of how to cast a ray.
Unity Raycasting from Camera
Video Tutorial
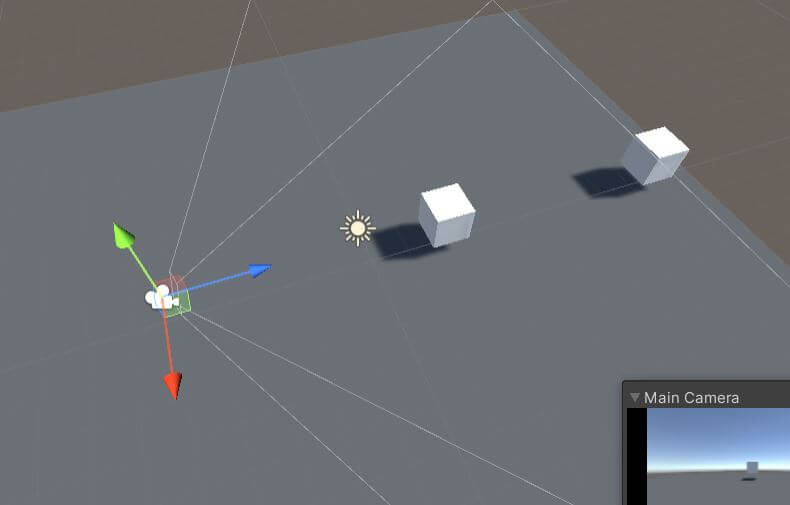
Now that you understand how Raycast works in Unity3D. Let’s try it out in a demo scene. We will create two cubes and set them into two different layers. We will try to hit the cube on the back. Here is the video of what we are going to do.
We will skip the basics like how to create a project in Unity3D. I am assuming you already have a project to cast the ray.
Step1: Setting up the scene for Raycast
- Create a new scene and go to the hierarchy window.
- Select Create (+)>3D object>cube. Add two cubes to the scene view.
- We will be casting the ray from the camera so, let’s align the cube one behind the other from the cameras preceptive. You should be able to see only one cube in the game window.
Step2: Adding the script
- Create a new script component for the camera and name it “ForRaycasting”. The camera will be the origin point for the ray.
- Add the script below. Remember the script name and the class name should be the same.
- Save and play.
using UnityEngine;
public class ForRaycasting : MonoBehaviour
{

    void FixedUpdate()
    {
        RaycastHit hit;

        if (Physics.Raycast(transform.position, transform.forward, out hit, 10))
        {
            Destroy(hit.collider.gameObject);
        }
        else
        {
            Debug.Log("Did not Hit");
        }
    }
}
In the above script we are Raycasting to a range of 10 Units in the forward direction. Physics.Raycast returns true if the ray hits a collider or else it will return false. The hit point data will be available in the hit variable for the above script. We are using that to destroy the game object that we hit.
If you do not hit anything, check the direction and length of the Ray.
Ignoring a layer during Raycast
It often comes to a situation where we don’t want the ray to hit everything. For example, implementing friendly fire in an FPS game. You don’t want your fire to hit friends so, you can just add the friendly players to a layer and ignore them from Raycast hits. To ignore a layer from the Raycast, you just need to add the bit mask of the layer index to your Raycast expression. You need to add the variable shown below and modify the if statement from the above code. You can also check out our detailed article on LayerMask.
The LayerMask variable needs to be inverted to ignore the layer.
int layerMask = 1 << 5;//bit mask for layer number 5
layerMask=~layerMask
//add the 2nd line if you want to ignore layer 5 if not added it will Raycast only to layer 5
if (Physics.Raycast(transform.position, transform.TransformDirection(Vector3.forward), out hit, 10, layerMask))
Now let’s try to bypass the cube in front and hit the cube at back using the layermask.

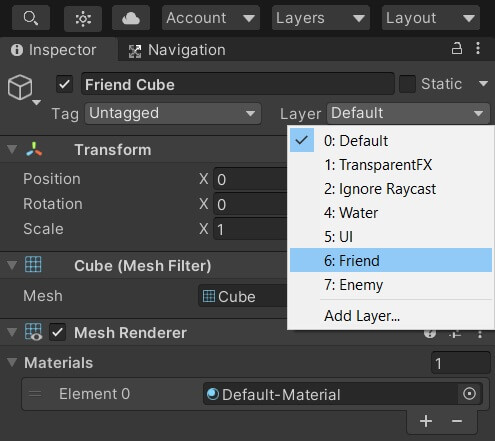
Creating layers for our Objects
- Let’s create two layers called enemy and friend.
- Click layers dropdown on any Gameobject’s inspector view.
- Select Add layer and enter the name of the layer.
- Assign the cube in front of camera as friend and the cube on the back as enemy.
Here is the updated code
using UnityEngine;
public class ForRaycasting : MonoBehaviour
{

    void FixedUpdate()
    {
        int layerMask = 1 << 6;//Since Friend is layer number 6
        layerMask = ~layerMask; //Inverted to ignore layer

        RaycastHit hit;

        if (Physics.Raycast(transform.position, transform.forward, out hit, 10,layerMask))
        {
            Destroy(hit.collider.gameObject);
        }
        else
        {
            Debug.Log("Did not Hit");
        }
    }
}
The above code will ignore the gameobject in the friend layer and destroy the enemy object if in range.
Casting a ray between two points in Unity
You need to tweak the above code a little to cast a ray between two points. I am assuming you are attaching this script to point1 and casting the ray in the specific direction. We can use the above example of two cubes and cast a ray between the camera and the enemy cube. This method can be used to find gameobjects in between two points.
using UnityEngine;
public class ForRaycasting : MonoBehaviour
{
    public GameObject target;

    void FixedUpdate()
    {

        RaycastHit hit;

        if (Physics.Raycast(transform.position, target.transform.position-transform.position, out hit, Vector3.Magnitude(target.transform.position-transform.position)))
        {
            Debug.Log(hit.collider.gameObject);
        }
        else
        {
            Debug.Log("Did not Hit");
        }
    }
}
Alternatively, you can use the Linecast function to cast a line between two points. Linecast() will return true if there are any objects with colliders between the two points. You can use the layer mask to ignore some objects. Unlike Raycast, Linecast() can be used to detect multiple objects in the path of the ray.
if (Physics.Linecast(transform.position, point2.transform.position))
        {
            Debug.Log("colliders found between the two position");
        }
Casting a ray from mouse position in Unity on mouse click
Mouse point is a little bit trickier than other things in Unity. The device screen is 2D and the game world is 3D. So, you need to convert the mouse position from screen point to game world space position. You need to use the camera for this purpose. Tag your camera as main camera before proceeding.
Converting mouse position to Ray
Ray ray = Camera.Main.ScreenPointToRay(Input.mousePosition);Cast a ray with the range and hit attribute
if (Physics.Raycast(ray, out hit, 10))
{
    Debug.Log(hit.gameobject);
}
Generally, the above code is combined with mouse click. Here is the code to raycast on left mouse button press
using UnityEngine;

public class RaycastOnClick : MonoBehaviour
{
    void Update()
    {
        if (Input.GetMouseButtonDown(0))
        {
            // Cast a ray from the mouse position
            Ray ray = Camera.main.ScreenPointToRay(Input.mousePosition);
            RaycastHit hit;

            if (Physics.Raycast(ray, out hit))
            {
                // Check if the ray hits any object with a collider
                // You can perform different actions based on the hit object
                GameObject hitObject = hit.collider.gameObject;
                Debug.Log("Hit object: " + hitObject.name);
            }
        }
    }
}
If you are using the new input system then check out our tutorial on how to get mouse position in new input system.
More details about Raycast hit
Raycast hit contains all details about the object hit by the Raycast. If the Raycast does not hit any object then Raycast hit returns “Null”. You can get the following details about the hit object.
- Gameobject.
- Collider attached to the object.
- Distance of the object from the origin.
- Transform
- Rigidbody details
RaycastAll to hit multiple objects
If you are looking for a list or array of objects hit by a Raycast, then Raycastall is your best option. Raycastall returns an array of gameobjects that were hit by the ray. This is how you can use it in code
 RaycastHit[] hits;
 hits = Physics.RaycastAll(transform.position, transform.forward, 50.0F);
    foreach(Raycasthit i in hits)
    {
       Debug.Log(i.gameobject);
    }
Make the Ray visible in the Unity editor
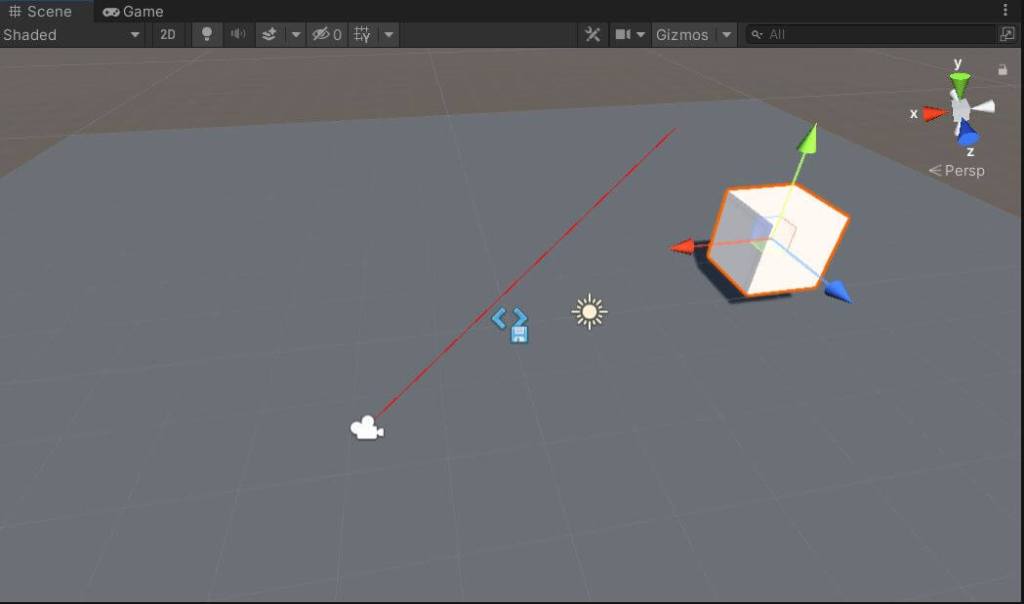
Raycast is an invisible ray. It’s not visible in both scene and game view. You can use Debug.DrawRay(origin,direction,color) to draw a ray in the Unity editor. But to make it similar to the ray we have cast you need to use the same ray.
Normally to cast a ray, you don’t need to create a ray variable. You can put the Raycast expression in an if statement and it will return true if it hits something. To draw the ray, we will create a ray variable that takes the origin and direction as input. Then we draw a ray with these properties.
using UnityEngine;
public class Raycasting : MonoBehaviour
{

    RaycastHit hit;
    void FixedUpdate()
    {
        Ray ray=new Ray(transform.position, transform.TransformDirection(Vector3.forward));

        if (Physics.Raycast(ray, out hit, 10))
        {

            Debug.Log(hit.collider);
        }
        else
        {
            Debug.DrawRay(ray.origin, ray.direction*10f,Color.red);

            Debug.Log("Did not Hit");
        }
    }
}
Length of Debug.DrawRay
Unity3D docs is a little silent in this area. It doesn’t clearly state how to control the length of the ray in Debug.DrawRay. Length of the ray depends on the magnitude of the direction vector. In the above example, we have used a unit vector and multiplied it with the required length. You cannot multiply it with Mathf.Infinity to make it infinite in length. it doesn’t work. You can only Raycast to infinite distance but cannot draw a ray of infinite length. You can use a big number like 100000f to solve the problem.
Debug.DrawRay(ray.origin, ray.direction*10000f,Color.red);Make the Ray visible in your game
The Debug.DrawRay was about making the ray visible in Unity editor but if you build the game the ray won’t be visible in the game. If you want the ray to be visible in your game then you need to use the line renderer. You can set the start and end point as shown in the script below.
using UnityEngine;
public class Raycasting : MonoBehaviour
{
    LineRenderer lin;

    RaycastHit hit;
    void Start()
    {
        lin=GetComponent<LineRenderer>();
    }
    void FixedUpdate()
    {
        Ray ray=new  Ray(transform.position,transform.forward);

        if (Physics.Raycast(ray, out hit, 10))
        {

            Debug.Log(hit.collider);

        }
        else
        {
            lin.SetPosition(0,ray.origin);
            lin.SetPosition(1,ray.direction*10f);

            Debug.Log("Did not Hit");
        }
    }
}
Get the intersection position of Raycast
In most of the cases, we need to spawn a game object at the place where the ray hit the collider. This data is available in the RaycastHit class. Here is a sample code to get the position where the ray hit
Ray ray=new  Ray(transform.position,transform.forward);

        if (Physics.Raycast(ray, out hit, 10))
        {

            Debug.Log(hit.point);

        }
RaycastHit.point saves the vector 3 position of the point where the ray intersects the gameobject.
Raycast FAQs
Should you use Raycast in Update or Fixed Update?
The reason why fixed update is used in the above script is, Raycast is a physics engine property, all physics related functions must be called inside void FixedUpdate and not void Update. Also, it will help you to stop Raycasting when you pause your game in Unity3D with timescale.
Is Raycasting performance expensive?
Raycast is a very helpful function but needs to be used carefully. Many developers avoid Raycast in order to boost performance. But you need not worry unless you are making a very performance hungry game. Just keep in mind a few things and you should be good.
- Never forget to provide the range of Raycast.
- Try to avoid multiple Raycast simultaneously.
- Use Raycast with a condition like button press inside
void Update. - Avoid Raycasting against a mesh collider.
- Use layer mask effectively.
When to use Raycast?
Mostly Raycast is used to find objects in a particular direction or for shooting. But, one thing to be kept in mind while using Raycast is the effect on performance. If you cast multiple rays of infinite length then your game performance is going to suffer. The general practice is to Raycast when some action happens. For example, in a shooting script Raycast is done only when the mouse button is pressed.
You can also use Raycast for collision detection and unlike Unity’s inbuild collision detection, Raycast doesn’t require a Unity Rigidbody component.
Can Raycast hit objects without Colliders?
Raycast requires colliders in order to interact with the game objects. Raycast will detect objects that have trigger colliders too. Any game object without colliders will not trigger a hit. The object hit will be available in Raycast hit.
An important thing to note is Raycast will not detect colliders for which the Raycast origin is inside the collider. This limitation can be overcome using a setting in case of a 2D game.
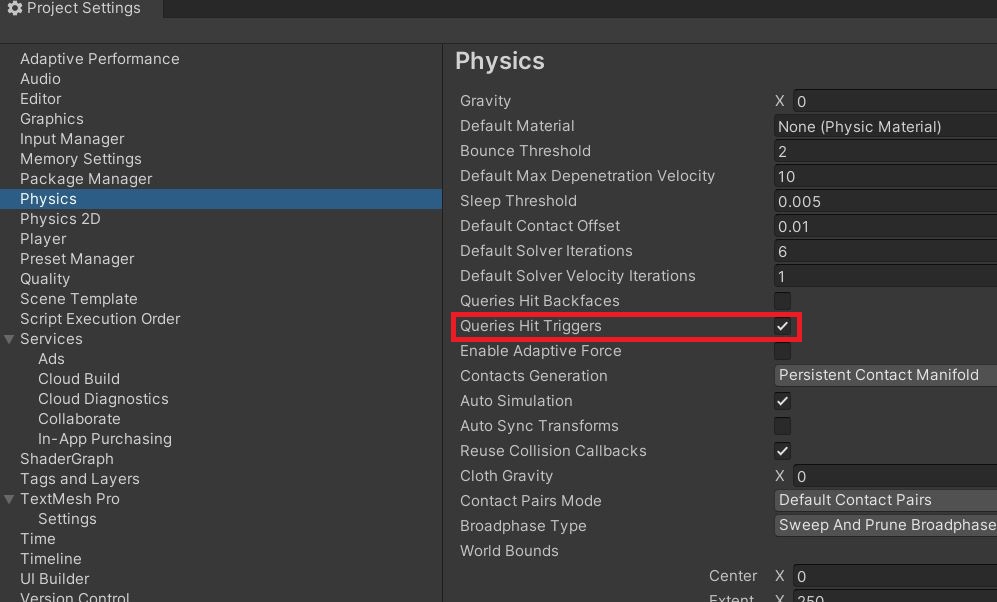
Ignore Triggers in Unity Raycast
Unity allows users to select whether or not Triggers should be detected by a raycast. This setting is available inside Edit > Project Settings >Physics. Uncheck “Queries Hit Triggers” to ignore triggers from raycast.
Common Reasons why your Raycast is not working in Unity
- Trying to hit the wrong type of Collider. A 3D Raycast cannot hit a 2D collider and vice versa.
- No collider attached to the object you are trying to hit.
- The object is set as inactive.
- Raycast is called within the Start function. You need to call it in the
void Updateorvoid FixedUpdate. - Timescale is set to 0.
- The function name should be
Physics.Raycastfor a 3D game andPhysics2D.Raycastfor a 2D game. - Length of the Ray is smaller than the distance between the objects.
- You are casting the Ray in the wrong direction.
- The Raycast origin in inside the collider.
Hope the post covered all the required aspects of Unity Raycast. You can shoot different shapes like sphere or box using Unity Spherecast and Boxcast, which are very similar to Raycast.
Raycast can also be used in 2d games but the syntax differs. Here is our detailed tutorial on 2D Raycast in Unity.
If you have any questions, you can leave them in the comment section below. For the next tutorial, we will learn how to instantiate a prefab.
Thanks for the In-depth tutorial on Unity Raycast. I was struggling to make the ray visible in my game. This tutorial helped me a lot.
Thanks for the feedback. Glad it was of help.