2D character movements can get a little tricky, but with the understanding of the basic concepts, it shouldn’t be difficult. In this article, we will make a simple 2D character controller with Unity 2D physics. We will go through the movement and jump features and also discuss the common issues faced with 2D character controllers. We will also see some of the top ready to use assets for 2D characters on Unity asset store.
If you are looking for a complete 2D platformer tutorial, you can check out our article on creating a 2D platformer from scratch.

For the purpose of this tutorial, we will be using the default Unity square as the character and the platform. So, go to the hierarchy window and click on the + sign. Then navigate to 2D Object>Sprites>Square. Let’s rename it as Player.
Add another square and set the X scale to 10. Rename this as platform. Let’s set different colors to the player and the platform. Set the player position to little above the platform.
Now that we have our character and the platform, let’s get started.
2D Player Movement
Select the player and add Rigidbody2D and box collider 2D components. Then Select the platform and add a box collider 2D. Now if you hit play, the player should fall and rest on the platform.
Add a new script to the player and name it as “PlayerController”. Open the script for editing.
We will get the rigid body component inside the Start() and add force depending on the player input. Here is the movement script.
using System;
using UnityEngine;

public class PlayerController : MonoBehaviour
{
    Rigidbody2D rb;
    [SerializeField]float moveForce;
    float maxVelocity=3;
    // Start is called before the first frame update
    void Start()
    {
        rb=GetComponent<Rigidbody2D>();
    }

    void FixedUpdate()
    {
        PlayerMove();
    }

    void PlayerMove()
    {
        if( rb.velocity.magnitude<maxVelocity)
        {
            rb.AddForce(Input.GetAxis("Horizontal")*Vector2.right*moveForce);
        }

    }
}
Set the moveForce value and your player should now be able to move. We have clamped the velocity to a maximum of 3, so if you want the player to move faster, increase the value of maxVelocity in the script.
Since the character that we are using in this tutorial is a square, it doesn’t matter which way its facing, but in case of a 2D sprite, you have to flip the sprite based on the movement direction.
Making the player jump
Jump is where things get a little complicated. We are going to add an upward force when the player presses the space bar. But we need to check if the player is grounded before adding the force. The best way to ground check is to use a boxcast. Here is the complete player controller script with movement and jump.
using System;
using UnityEngine;

public class PlayerController : MonoBehaviour
{
    Rigidbody2D rb;
    [SerializeField]float moveForce;
    [SerializeField]float jumpForce;
    [SerializeField]float maxDistance;
    [SerializeField]Vector3 boxSize;
    [SerializeField]LayerMask layerMask;
    float maxVelocity=3;
    // Start is called before the first frame update
    void Start()
    {
        rb=GetComponent<Rigidbody2D>();
    }

    void FixedUpdate()
    {
        PlayerMove();
         if(Input.GetKeyDown(KeyCode.Space) && GroundCheck() )
        {
            rb.AddForce(transform.up*jumpForce,ForceMode2D.Impulse);
        }
    }

    void PlayerMove()
    {
        if( rb.velocity.magnitude<maxVelocity)
        {
            rb.AddForce(Input.GetAxis("Horizontal")*Vector2.right*moveForce);
        }

    }
    void OnDrawGizmos()
    {
        Gizmos.color=Color.green;
        Gizmos.DrawCube(transform.position-transform.up*maxDistance,boxSize);
    }
    private bool GroundCheck()
    {
        if(Physics2D.BoxCast(transform.position,boxSize,0,-transform.up,maxDistance,layerMask))
        {
            return true;
        }
        else{
            return false;
        }
    }
}
There is an OnDrawGizmos function to help you setup the boxcast for ground check. If you need more details on this, check out our tutorial on character jump.
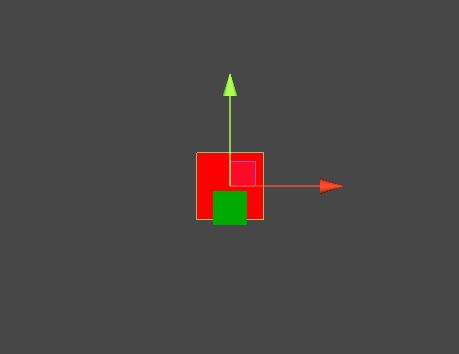
Set the jump force and the box size. The box size should not be greater than the player and the max distance should be equal to the distance from the center of the player and the feet. This is how your box should look like in the scene view
If your space bar press is not detected in some frames, it might be due to the FixedUpdate(). In this case, move the jump script to the Update().
Common issues faced with 2D character controllers
Now you have a player that can jump and can move. Now let’s see some of the common issues with 2D character controller
Player getting stuck between two platforms
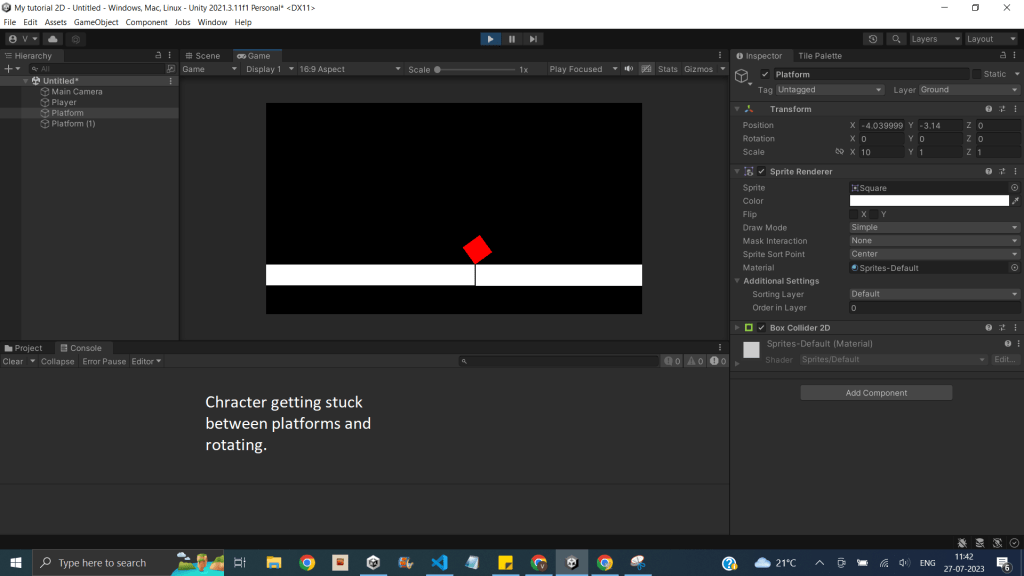
Player might get stuck between two platforms and tumble. To avoid this, we have to do two things.
- Set the freeze rotation along Z axis constraint on the RigidBody2D component.
- Use a capsule collider in place of box collider or other colliders with sharp edges. If the capsule collider doesn’t fit properly on to the player, replace the collider on the platform to a capsule collider.
Player sticking to the edge of the platform while jumping
In some cases, the 2D player gets stuck to the sides of the platform, like shown in the image below. If this is happening with your player, then do the following.

- Make sure the colliders are not in any irregular shape. Mostly happens if you are using a polygon collider 2D. Use capsule colliders wherever possible.
- Add a physics material with zero friction to the colliders attached to the platforms. This will make the character slide and fall when stuck to the sides.
Best unity 2D character controller asset
MJPlayerMovement
MJ Player movement asset is an all-in-one character controller for Unity. It is not only useful for 2D games but can be used for 3D also. The options available are plentiful with this asset. You can control all the aspects required to make a good 2D controller experience. The preset option to select the type of controller is very handy. You can switch between using a keyboard or a controller with just a drop-down menu.
You can set the following features of your character
- Mode
- Movement
- Input
- Jump
- Alingment
- Gravity
- Brake
- Climb
- Sticky
There are preset options available for humanoid and ball. This sets up your humanoid character within minutes.
Advanced Character Movement 2D
Advanced character movement 2D is geared toward 2D platformer games. It comes with all the tweaks that is needed to make a full character controller for a platformer. The asset includes a demo sample for understanding how it works. It’s very simple to setup and get going.
Features
- Horizontal movement, adjustable speed and friction
- Jump, long jump, double jump, wall jump
- Crouch, run, walk, wall surfing
- Different dust effects for jump, double jump, walk, land
Easy Character Controller 2D
This one is little different from the normal character controller. Easy character controller uses raycast for player movement compared to normal physics used by other controllers. As this asset doesn’t use the default physics system, you can bend the rules of physics with this asset. This is perfectly good for anyone making a game based on custom 2D physics.
Features
- Walk/run, crouch and attack mechanics are included in the script.
- Controllable jump. There are different levels of jumping that can be adjusted from the inspector window.
- Animation handling. Just drag and drop the sprites to respective tabs and you are good to go.
- The document is well made to explain all the features.
- Easily configurable.
We have come to the end of the tutorial, now it’s your turn to create a 2D character controller. If you have any feedbacks or questions feel free to leave them in the comment box below.