Sounds are very important in a game. If a sound effect is played at the wrong time, it can ruin the whole gameplay experience. You need the right sound to play at the right time. Unity has many tricks to play sound in synchronous with your gameplay. In this tutorial of our learn Unity guide, we will see how to play an audio clip in Unity, with and without code.
AudioSource
To play audio in Unity, you need a component called AudioSource. The AudioSource controls which sound is played where and how. You can customize the AudioSource in the inspector window or you can use a script to set the parameters.

Now, let us see some different scenarios on how to play audio using the AudioSource component.
Play audio clip on scene start
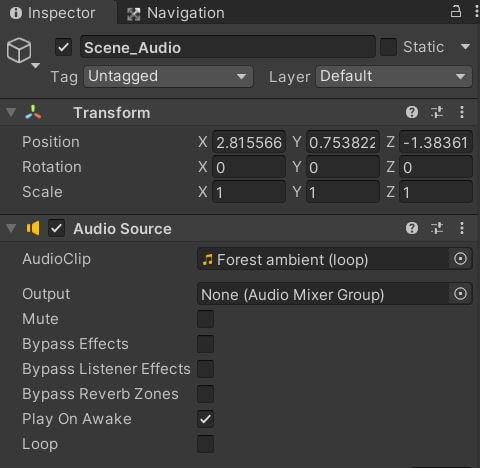
You can play an audio during the start of the scene by setting the “Play on Awake” parameter on your AudioSource. Here is how to do it.
- Create an empty game object in the hierarchy window, by clicking + sign>Create Empty.
- Select the empty game object and go to the inspector window. Click on Add Component.
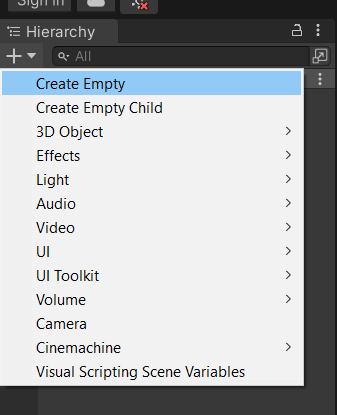
- Search for AudioSource and click Add.

- Drag and drop your audio file to the AudioClip dialog box under AudioSource in the inspector window.
- Check “Play On Awake” to play the audio when the scene loads.
- Check Loop option if required.
Play Audio clip based on a condition
In most of the cases we need to play an audio in response to some actions like jump, hurt or attack. You need a script to do this. In the below script, we will get the AudioSource component and play the audio when required using AudioSource.Play(). Follow the steps below to play the audio after a time delay using script.
- Create a new C# script called Play_audio.
- Copy and paste the code below.
- Attach your script to the game object with the audio source.
- Assign your clip to the source.
- Disable “Play on Awake” in the audio source.
- Play the game and the audio clip will play when the condition in the script is met.
Below script uses time delay as the condition. You can add your required condition to the script.
public class Play_audio : MonoBehaviour
{
    bool ready=false;
    float delay=5f;
    AudioSource aud;
    bool audioplayed=false;

    void Start()
    {
        aud=GetComponent<AudioSource>(); //get the audio source component
        StartCoroutine("Delaythis"); // Start Coroutine for delay

    }

    IEnumerator Delaythis()
    {
        yield return new WaitForSeconds(delay);
        ready=true; //set true after 5 seconds

    }

    void Update()
    {
        if(ready && !audioplayed)
        {
            aud.Play(); //play the audio
            audioplayed=true;
        }
    }
}
Play an Audio clip at point
In some cases, we need to play audio at a given place. For example, if you have an explosion effect, the audio should play at the point of the explosion. Unity uses AudioSource.PlayClipAtPoint(audio clip, Vector3 point) to play audio at a given point. Here are the steps to use it in a script.
- Create a new script called play_at_point.
- Copy and paste the below code to the script.
- Add the script to any game object in the scene.
- Assign audio clip to the script in the inspector window.
- Assign the position to at which the clip has to be played.
- Play the game and the audio clip will play at the assigned point.
using UnityEngine;

public class play_at_point : MonoBehaviour
{
    public Vector3 point;
    public AudioClip aud;

    void Start()
    {
        AudioSource.PlayClipAtPoint(aud,point);
    }
}
A common mistake done by beginners in this case is, they attach the script to the game object that gets destroyed and the script never gets called. For example, during explosion we destroy the game object that creates the explosion. If your script is attached to the game object that we destroyed then it will never play the audio.
How to play an audio clip without audio source
- Create a new script.
- Copy and paste the code from play audio clip at point section above.
- Attach the script to your game object.
- Set position to (0,0,0).
- Press play and the audio will play without an audio source.
Disadvantages of playing audio clip without an audio source
- You cannot control the audio play settings.
- You cannot stop the audio.
- No control on sound effects.
- Audio will be looped continuously.
How to play audio clips in sequence in Unity
Sometimes you might have to play a list of songs in the background. It is possible by loading a different clip to the AudioSource after the current audio clip has finished playing.
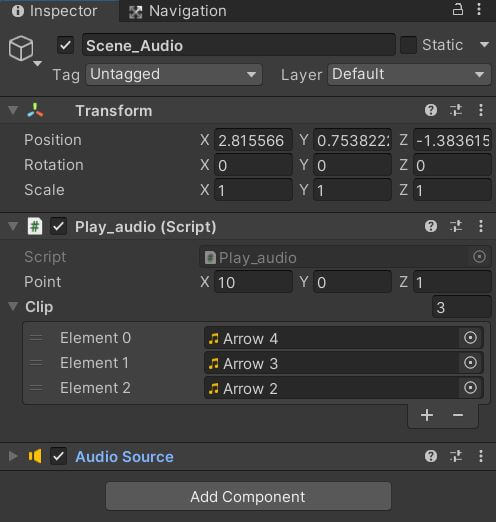
- Create a new script.
- Copy and paste the below code on to the script.
- Attach script and AudioSource to an empty game object.
- Uncheck Play on Awake.
- Assign the number of clips to the public variable in the inspector.
- Drag and drop your clips to the script.
- Now all your audio clips will play in sequence.
using System.Collections;
using System.Collections.Generic;
using UnityEngine;
using System.Threading.Tasks;

public class Play_audio : MonoBehaviour
{
    public Vector3 point;
    public AudioClip[] Clip;
    AudioSource aud;
    float delay_time=0f;


    async void Start()
    {

        aud=GetComponent<AudioSource>();
        foreach(AudioClip n in Clip)
        {
            await Task.Delay((int)delay_time*1000); //Task.Delay input is in milliseconds
            playaudio(n);

        }
    }

    void playaudio(AudioClip n)
    {
        aud.clip=n;
        aud.Play();
        delay_time= n.length+1;//1 second is added to cater for the loading delay

    }
}
Above script uses async and task.delay to play the audio at a time difference.
If you are not sure where to find sound for your game use our Game asset finder or hire a sound designer.
If you have any other questions regarding audio clips, feel free to leave a comment below. For the next tutorial, we will learn how to sync sound with animation.
Went through a lot of blogs, found the right answer here. Really thank you! Cool.