Materials and textures in Unity are an essential aspect of creating visually appealing and realistic 3D scenes. With Unity materials and textures, you can easily adjust the appearance of an object by changing its material, without having to modify its geometry. In this article, we will explore the basics of Unity‘s material system, including how to create and apply materials, how to edit material properties, and how to add textures to materials.
What are Materials in Unity?
Materials in Unity are a way of defining the appearance of an object’s surface in terms of how it interacts with Unity light. A material in Unity defines the properties of an object’s surface, such as its color, texture, reflectivity, and transparency. Materials are associated with objects through a material component, which is attached to the object’s mesh.

Materials in Unity can be as simple or complex as needed, depending on the requirements of the project. Simple materials can consist of a single flat color, while more complex materials can include multiple textures, special effects, and physically-based shading to simulate the way that light interacts with the object’s surface.
What are Textures in Unity?
Textures in Unity are 2D images that can be applied to the surface of 3D objects, to add detail and realism. A texture is essentially a bitmap image, that is mapped onto an object’s surface, either to define the object’s color or to add detail such as roughness, bumpiness and more. In Unity, textures are used in combination with materials to define the visual appearance of an object.
Textures can be imported into Unity from a variety of image formats, including PNG, JPG, TGA, and others. Once imported, textures can be edited and optimized in Unity, including scaling, tiling, and compression. Textures can also be combined with other textures, such as normal maps and ambient occlusion maps, to create more complex and detailed materials.
Types of Textures
In game development, several types of textures are used to enhance the visual appearance of objects and environments:
- Albedo/Diffuse Texture: This texture defines the base color of an object and is the foundation of most materials. It can be a simple flat color or a detailed image, depending on the level of detail desired.
- Normal Map: A normal map is a type of texture that provides information about the direction of the surface normal for each pixel. This information is used to simulate surface detail, such as bumps and dents, without adding additional geometry.
- Ambient Occlusion Map: An ambient occlusion map defines the shadowing and occlusion of an object’s surface, providing information about how the surface is affected by ambient light.
- Roughness Map: A roughness map defines the roughness of an object’s surface, which affects the way that light scatters and reflects off of the surface.
- Height Map: A height map is a grayscale image that provides information about the height and depth of an object’s surface. This information can be used to create more detailed and realistic materials, including displacement and parallax mapping.
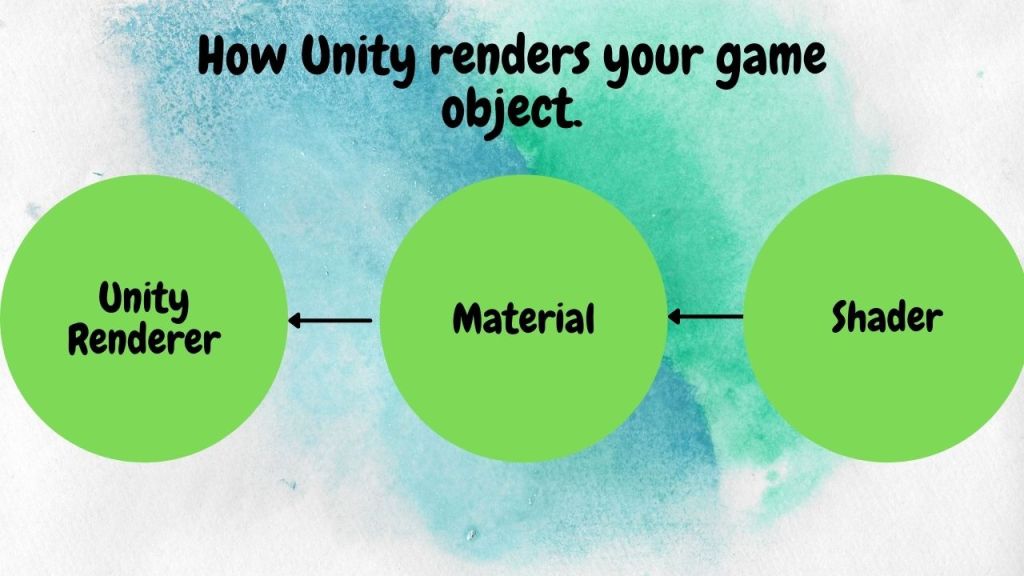
How Unity renderers an Object on Scene
Unity renders an object in a scene by executing a sequence of steps, which involve shading the object’s surface to produce the final image. Here’s an overview of how Unity renders an object:
- Geometry Processing: The object’s mesh data is processed, including transformations and culling of invisible polygon faces.
- Shader Execution: The object’s material is evaluated and its shader is executed. The shader provides instructions on how to calculate the color and other properties of each pixel on the object’s surface.
- Light Calculations: Unity calculates lighting for the object, including reflections, shadows, and ambient light.
- Final Color Combination: The final color for each pixel is calculated by blending the lighting, material, and transparent elements.
This sequence of steps is repeated for each object in the scene, with the final image being a combination of all the objects in the scene.
By default, Unity uses the build in shaders for the material property calculation but you can create custom shaders using shader graphs or shader script.
Creating a new Unity material
You can either use the + sign on the project window or right click on the project window to create a new material.
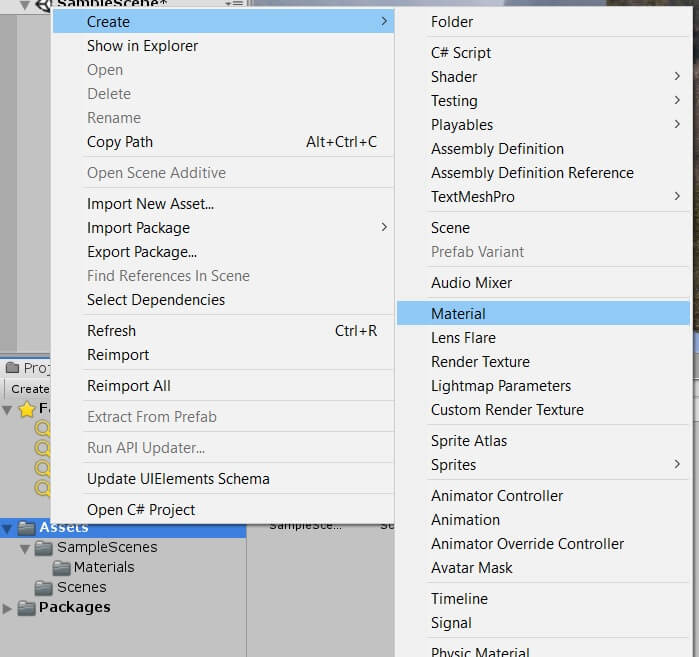
You can modify the Propeties of the material to your requirement. Let’s see how to create different types of material with some examples.
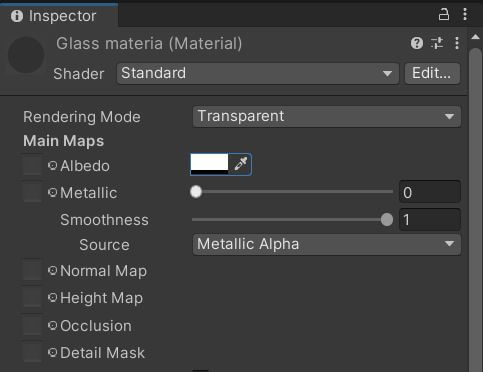
Creating a Transparent material
- Go to project window.
- Click on the + sign.
- Select Material and rename the new material as Glass material.
- Go to Inspector and select Rendering Mode as Transparent.
- Set the alpha value in Albedo to zero.
- Adjust Metallic and Smoothness values. (Keep Metallic minimum to obtain transparency).
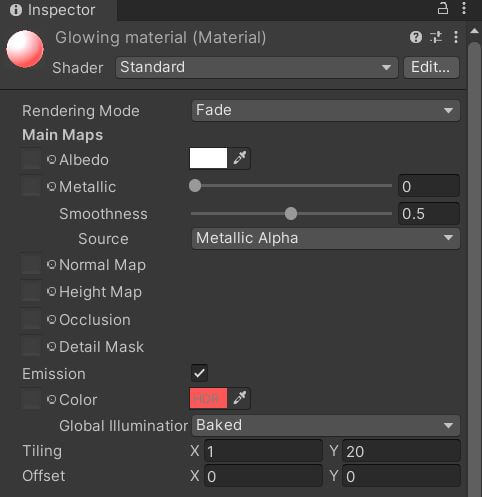
Creating a Glowing Material
- Go to project window.
- Click on the + sign.
- Select Material and rename the new material as Glowing material.
- Go to Inspector window and check the Emission box.
- Select the color of light and intensity.
- Select the way the emission will affect the environment using the Global Illumination setting.
Adding Unity material to your Gameobject
There are two different ways to add the material to your game object.
First method
- Select the gameobject in the Hierarchy or Project window.
- Go to Meshrenderer (renderer may differ based on the type of Gameobject).
- Set the material in the Materials tab. You can set more than one material to an object.
Second Method
This is the easiest way to apply a material. Drag and drop the material on to your gameobject in the Hierarchy view or scene view.
Tip: Gameobject should have a renderer to apply the material.
Applying Textures to material
Material properties allow you to change the color, transparency, softness and more but you cannot apply a design on the material without a texture.
First you need to import the texture on to your Unity project. Texture can be any images but if you are looking for something specific then check out the super texture collection on Unity Asset store. You can also check out our list of websites to get free Unity Assets.
Once you have your texture in your Unity project, then you can just drag and drop the texture to the albedo property of the material.
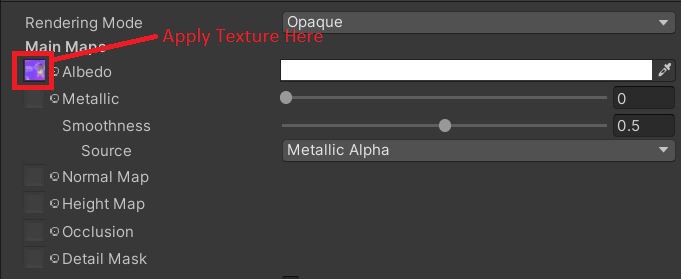
You can also set textures for the following property
- Metallic
- Normal Map
- Height Map
- Occlusion
- Details Mask
Changing Unity Material property from script
You can also change the property of a material during runtime from script. Let’s try to change the color of the material for the purpose of this tutorial
We will access the renderer of the object to get the material and change the color using a script.
Add a script called Color_change to your game object.
Copy and paste the code below to change the color to red when the game starts.
using UnityEngine;

public class Color_change : MonoBehaviour
{
    Renderer col_rend;
    // Start is called before the first frame update
    void Start()
    {
        col_rend=GetComponent<Renderer>();
        col_rend.material.color=Color.red;

    }

}
This will instantly change the color to red.
You can also use the SetColor function of Unity to change the color. Here is the syntax of how to use SetColor.
using UnityEngine;

public class color_change : MonoBehaviour
{
    Renderer ren;
    // Start is called before the first frame update
    void Start()
    {
        ren=GetComponent<Renderer>();
        ren.material.SetColor("_Color",Color.red);

    }


}
You can use RGB values in place of giving the color name if you have some specific color in mind. The RGB values has 4 components. The first 3 are the R, G and B values and the 4th one is the alpha that decides on the transparency.
Let’s give a vector4 as the input to the SetColor.
Here is the sample code
using UnityEngine;

public class color_change : MonoBehaviour
{
    Renderer ren;
    // Start is called before the first frame update
    void Start()
    {
        ren=GetComponent<Renderer>();
        ren.material.SetColor("_Color",new Vector4(1,0,0,1));

    }


}
If you want it to change slowly from one color to another color you can use Unity lerp. Here is the sample code
using UnityEngine;

public class Color_change : MonoBehaviour
{
    Renderer col_rend;
    float timer=0;
    // Start is called before the first frame update
    void Start()
    {
        col_rend=GetComponent<Renderer>();
    }

    void Update()
    {
         col_rend.material.color=Color.Lerp(Color.black,Color.red,timer/5);
         timer+=Time.deltaTime;
    }

}
In this tutorial, you have learnt, how to create materials and how to use textures. For our next tutorial, we will learn how to quit a game in Unity.